
One of the best things about summer? A lemonade stand in the neighborhood! If your child has been begging you to make them a lemonade stand too, I have a really easy project for you! So easy that the kids can help too! Make sure to keep reading for the free (and super simple) build plans for this wooden lemonade stand. It all starts with wooden crates and scrap wood.
how to make a wooden lemonade stand
To make a lemonade stand, here are the simple steps-
- Attach crates together to make the base.
- Cut wood for the sides, sign, and work top.
- Use screws or nails to connect the wood to the base to make the structure.
- Paint the lemonade stand base. Add the word lemonade to the sign.
- For a tablecloth look, add a skirt to cover up the crates
- Set-up the lemonade and sell it to neighbors!
Let’s start with the video tutorial so you get an overview on what I did. Then, I’ll dive in with more details below:
If the video doesn’t work here, you can watch it on YouTube here. It’d mean so much if you’d watch the video! I’m trying to get better at my video skills so I can grow my YouTube channel. If you have a few minutes to watch this and/or subscribe, I’d so appreciate it.
INSPIRATION FOR THIS PROJECT

I sketched out my ideas for this wooden lemonade stand project in my sketch book. I love having a place where I can take the image I have in my head and put it on paper! Plus, it’s a great way to communicate to my husband what I’m thinking.
SUPPLIES

- 2- 1″x4″ Boards (for the sides)
- 1″x8″ Board (for the sign)
- 2″x12″ Board (for the worktop)
- 4- Wooden Crates (for the base)
- 1 Yard Blue Gingham Fabric (for the skirt)
- Ultra Pure White Exterior Paint
- Beverage Dispenser
- Chalkboard Easel
- Chalk Marker
- Craft Paint in Spring Leaf, Butter, and Desert Sky
- Velcro (to attach skirt)
- Lemon Flower Pick
- Note, the Lemon tray and blue straw are also from Michaels, but I couldn’t find them online.

Tools
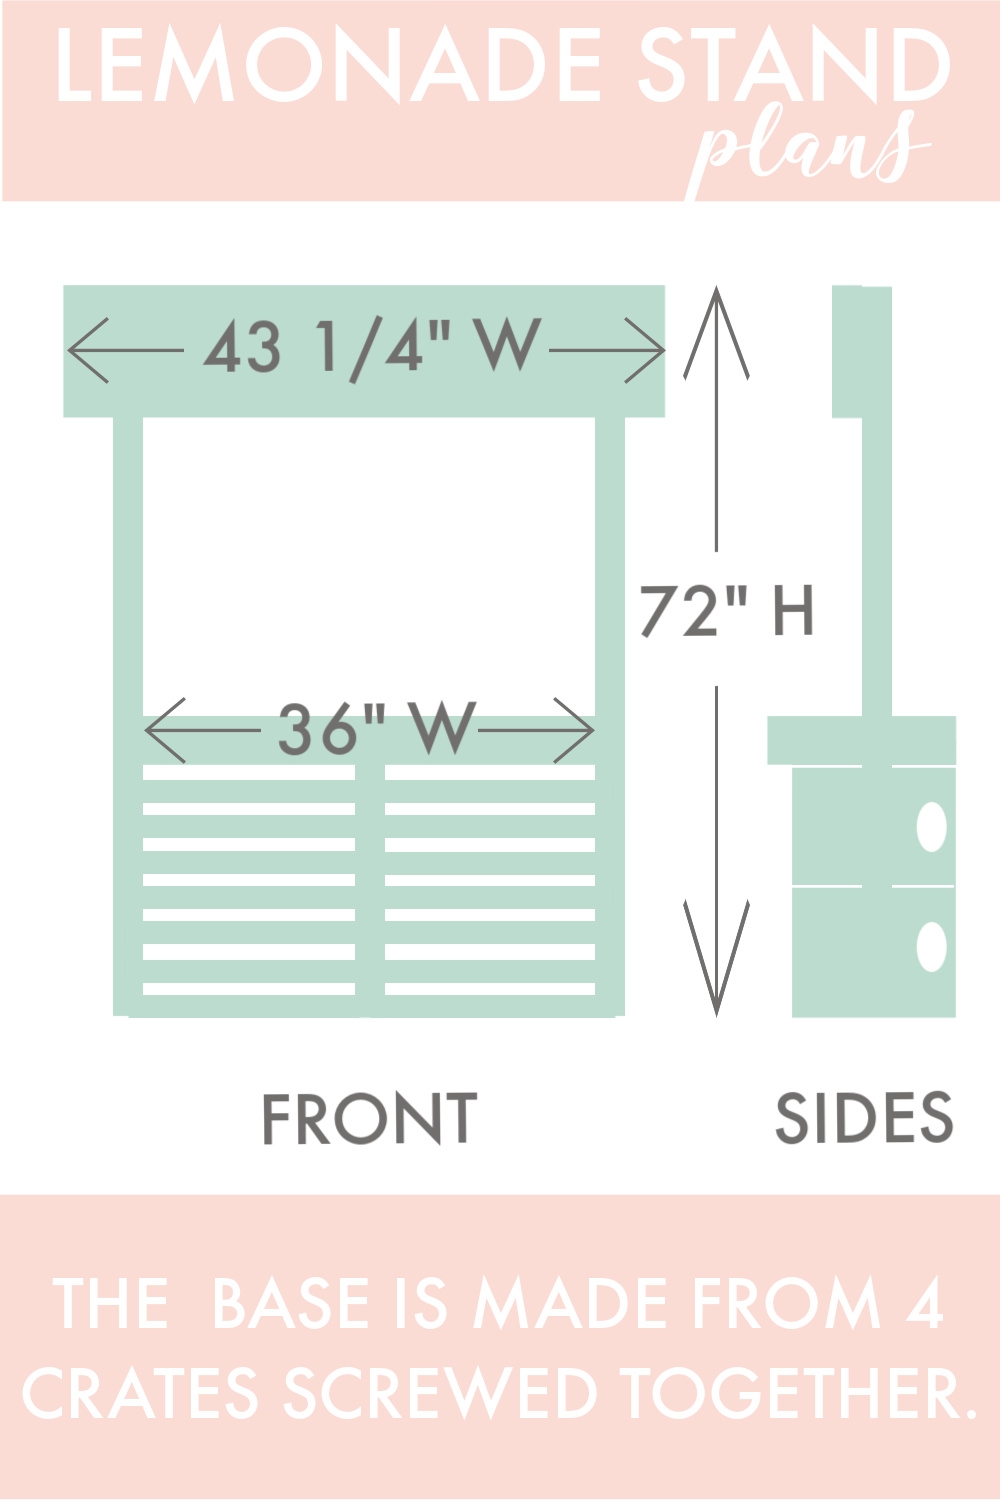
step 1- connect the crates to make. the base
For this project, the base of the wooden lemonade stand will be four Wooden Crates. These are super affordable and make it so this is a simple build! Plus, the crates add storage to the bottom of the stand and they help create a sturdy base.

Start by screwing two crates together. Put them side by side and screw the wood the touches together in 4 spots. Repeat for the second set of crates.

Next, use construction adhesive to attach the first set of crates to the second set. To do that, apply the construction adhesive to the top of one set of crates. Put the second set of crates on top of it.

Once glued, use clamps to hold them together as they dry.
step 2- cut the wood for the structure
Next, cut the wood needed to create the rest of the structure.

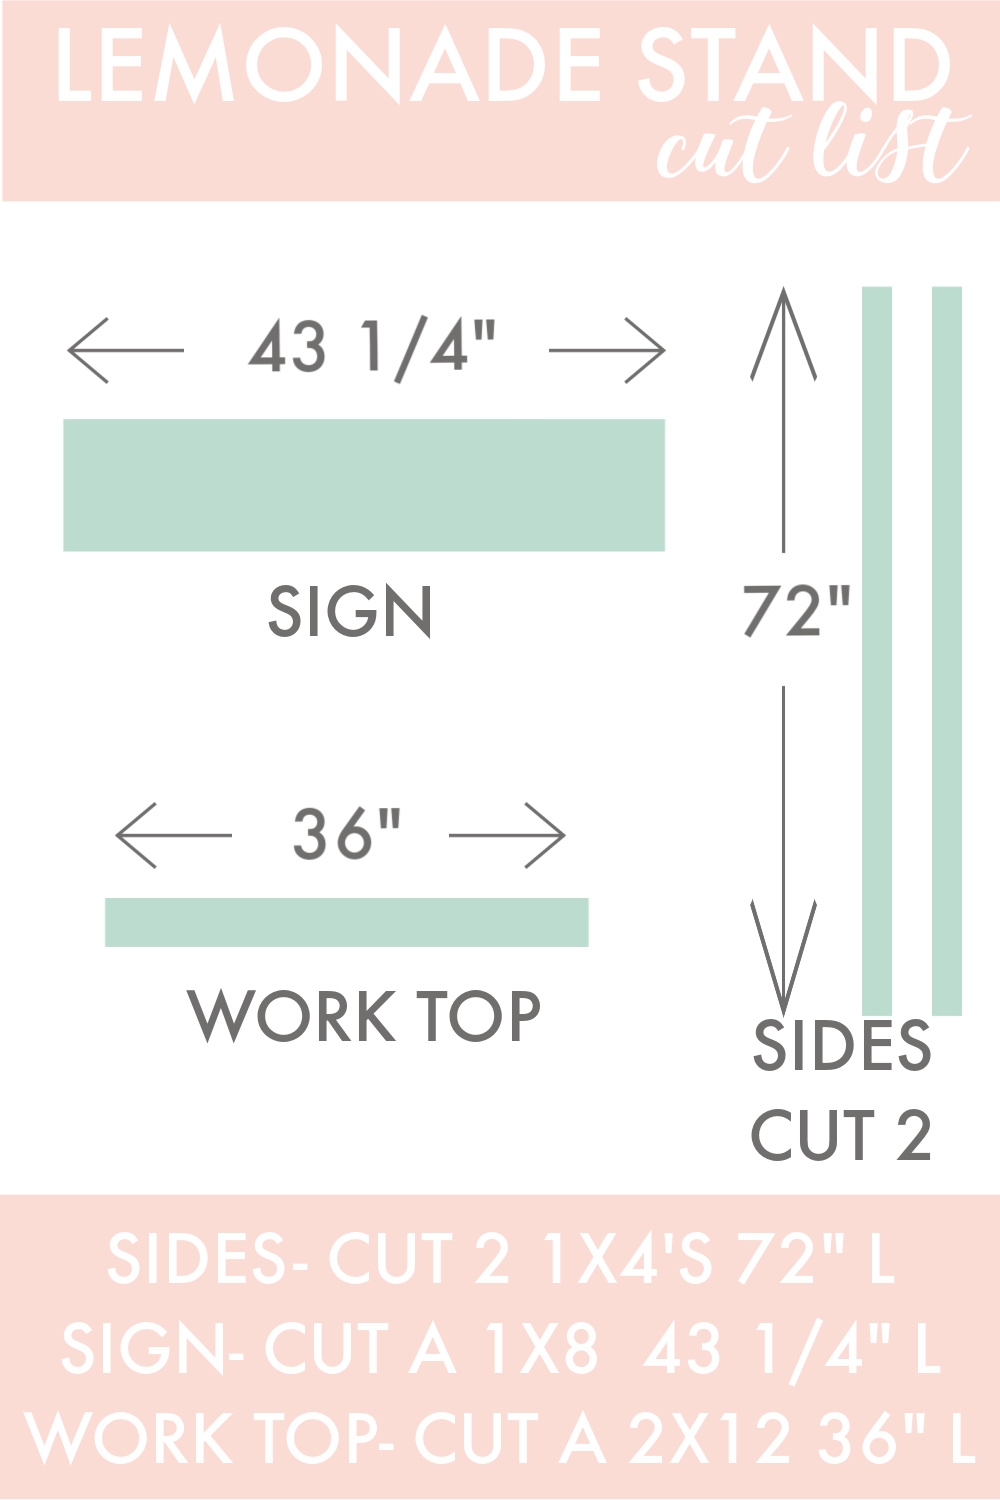
Here is the cut list-
- Cut 2- 1″x4″ Boards to 72″ long (these are for the sides)
- Cut the 1″x8″ Board to 43 1/4″ long (this is for the sign)
- Last, cut the 2″x12″ Board to 36″ long (this is for the worktop)
step 3- build the structure
And now, let’s take the wood we cut and attach it to the crate base.

First, use screws to attach the 1″x4″ Boards to each side of the crate. Mount them in the center of the crates. These boards will hold up the lemonade sign and will add stability to the base.

Next, use nails from the crate side and nail on the 2″x12″ Board. This becomes the worktop. Note, this board isn’t necessary but I like the idea of having a flat surface for where the drinks will be (instead of the slats from the crate).

For the last step of building the structure, attach the 1″x8″ Board to the top of the structure. This will be the board that makes the lemonade sign. Instead of using a board, another option is to use fabric bunting.

This completes the structure! Honestly, it could be left at this point with a lemonade sign, but I wanted to make it a little more crisp.
step 4- paint the frame and lemonade sign

To paint the structure, I used Ultra Pure White in Exterior Paint. I painted most of the structure, though I didn’t paint the backs or inside of the crate. The back will be covered in a skirt while the inside will be storage and I didn’t want to go to the trouble of painting it.

Since I used scrap wood for this project, it was a little rough. So after the first coat of paint, I used wood filler to fill any holes or divets. Once the wood filler dried, I sanded it smooth. This step was probably a little over the top, but I like a smooth look. It probably isn’t necessary if new wood is used.

Once the base is painted and dried, it’s time to paint the Lemonade sign. To do that, I first drew everything in pencil. I wanted a scallop border so I traced a round cup to get that. Then I drew in cursive “lemonade” with a small lemon.

When I had the sign as I wanted it, I went back with craft acrylic paint to add color to the sign.

For this project, I used Craft Paint in the colors Spring Leaf, Butter, and Desert Sky
step 5- sew a skirt

Finally, I’m sewing a skirt for the lemonade stand from 1 Yard of Blue Gingham Fabric. I cut the fabric to 27″ long and used a serger to finish the edges. The bottom got a hem. Then I gathered the top to give it some volume (and more of a skirt look).
The purpose of this skirt is 100% aesthetics (which is my favorite thing). It is also meant to look like a tablecloth.
Once the top is gathered, I sewed on Velcro.

We also stapled the other side of the Velcro over the top of the crates on the base of the lemonade stand.

Now, the skirt can be attached or taken off easily. This makes it so it can be washed or stored.
after

And here is how the lemonade stand came together with all the accessories on it. How cute?!

Don had lots of fun selling lemonade. His grandparents even came over for a cookie and a few glasses!

On the back, the crates worked perfectly to hold extra cups and even a little cash register for change.
are lemonade stands legal in the US?

Did you know that in most of the states, a permit is required to run a lemonade stand in the US? Without a permit they are illegal except in the following states- California, Colorado, Connecticut, Illinois, Louisiana, Missouri, Nebraska, Nevada, New York, North Dakota, Rhode Island, Texas, Vermont, or Utah.
how much should a kid charge for lemonade?

It’s tricky to know how much to charge for lemonade! When I was a kid I think it was $0.25. I’d suggest charging $0.50-$1.50 per cup. If the lemonade is fresh squeezed, charge more. Also think about the neighborhood you’re in- what price will work for where you live? We live in a budget friendly place, we are charging $1 per cup.
We also sold chocolate chip cookies. They’re my specialty- lol. A reader also gave me the great idea to sell cut flower bouquets. I’ll have to try that next time!
price breakdown
Let’s look at how much this project cost to make. All of the wood, I used as scraps from my shed. So that was free. I also had the Paint on hand. I spent $48 on the 4- Wooden Crates. The 1 Yard Blue Gingham Fabric cost $9.
The total for the wooden lemonade stand build came to $57.
For the accessories, I bought the Beverage Dispenser for $20. The Chalkboard Easel cost $7. While the Chalk Marker was $4. Next, the Craft Paint is $1 a bottle. I got three. Last, the Velcro cost $6
For accessories and the build I spent $97
conclusion

In conclusion, I’m really happy with how the wooden lemonade stand came together! It took one day to build and one day to paint it. Honestly, the whole thing could easily be done on a Saturday or over a few evenings. It’s a really simple build anyone could do. What do you think of this project? Would you try it?
Let me know if you have any questions in the comments!
 This post contains some affiliate links for your convenience. Click here to read my full disclosure policy.
If you love it, pin it!

