
My sister Kate is a teacher and loves reading. She lives in a newer house. In her living room, she has a large (and super tall) wall that’s been begging for a library to add a bunch of character to the space. I’ve been wanting to do an IKEA Billy Bookcase Hack Library. Now I can share how anyone can build one too!
before

My sister lives in a newer house. This is in a small living room with vaulted ceilings. They already had a bookcase there, but wanted to go much bigger!
how to IKEA Billy Bookcase Hack Library
Let’s start with the video tutorial so you get an overview on what I did. Then, I’ll dive in with more details below:
If the video doesn’t work here, you can watch it on YouTube here. I’d be over the moon happy if you subscribed to my YouTube channel! Videos are actually released on YouTube first (usually the night before they’re published on the blog). Thank you!
Inspiration
This IKEA Billy Bookcase Hack Library is inspired by Monica from House of Esperanza’s Library. Years ago I sent my sister Kate a picture of it saying she needed to do a library in her living room. This summer she decided she wanted to make it happen and I was so excited when she asked my husband and I to build it for here! Ready to see how we made it happen?!
SUPPLIES
Bookcases
- 4- Billy Bookcase 31.5″x79.5″
- 1- Billy Bookcase 15.75″x79.5″
- 4- Billy Bookcase 31.5″x41.75″
- 1- Billy Bookcase 15.75″x41.75″
Library Ladder
Screws
- 300-2 1/2″ Screws (to attach the lumber together)
- Cabinet Screws (to attach the bookcases together)
Lumber
- 4- 2″x4″x8′ Lumber
- 7- 2″x6″x14′ Lumber
- 3-2″x8″x16′ Lumber
- Shims (to level the bookshelf)
Trim
- 13′ of Baseboard Moulding (that we put upside down on the original moulding on the base)
- 13′ of Crown Moulding
- 7- 1/2″x7-1/4″x8′ boards (used for the trim on the middle and sides of the bookcase)
- 4- 1/2″ x 2-1/2″x8′ boards (used for the trim to cover the bookcase seams on the center bookcase- the larger gap)
- 3- 1/2″ x 1-1/2″x8′ boards (used for the trim to cover the bookcase seams on the side bookcases- the smaller gap)
Finishing Supplies
- Stickers to cover the Hardware
- Paint- Glidden Semi-Gloss in Pure White (to paint the trim)
- Paint Brush
- Ebony Wood Stain (for the ladder)
- Chip Brush (for staining the ladder)
- Tack Cloths (for removing the excess stain from the ladder)

price breakdown for the IKEA Billy Bookcase Hack Library– The price for all the Billy bookcases for this project is $650. Ordering the library ladder came to $875 with shipping. For building the frame, the wood, screws, and electrical parts came to $380. For the finish work, the trim, paint, and caulk came to $260.
Total price- $2,165
step 1- create the plan


Start by figuring out a plan. Measure the width of the wall the library will go on. The Billy bookcase comes in two widths- 31 1/2″ or 15 3/4″. Those same widths come in the 93-1/4″, 79 1/2″ or the 41-3/4″ height. So there’s 6 size choices. We didn’t use the 93-1/4″ height. I included screenshots of the sizes we used.


Note, on Ikea’s website they show more widths than I’ve listed, but it’s just multiple bookcases pushed together. So ignore those. They come in three colors- white, black, or birch.
Do the math to figure out how many bookcases can fit width wise on the wall. Our wall is 153″ wide so we ordered 4 of the 31 1/2″ w x 79 1/2″ h bookcases and one of the 15 3/4″ w x 79 1/2″ h bookcase– that’s 141″ wide. That gave us 11 1/4″ for the supports. If you’re doing more than one level high of bookcases, make sure to have space for supports on the sides.
how high will the library go?
Next figure out how high the library will go. We didn’t want to go all the way to the ceiling- that’d be too high to access the books with the ladder we ordered and it’d be tricky with the slanted ceiling. So on top of the 79 1/2″ bookcase we decided to do one level of the 41 3/4″ bookshelves.
To keep a symmetrical look, we ordered 4 of the 31 1/2″ w and one of the 15 3/4″ w x 41 3/4″ h bookcases for the top. Order or pickup the bookcases.
Note, we choose the 79 1/2″ high bookcases because they fit perfectly with the library ladder we ordered for this project. I did a lot of research of rolling ladders and I liked the price on this ladder, the reviews are good, and it’s nice that all the parts come together. Plus, it’s not a custom item so the shipping is pretty quick.
I created a mock-up that I sent over to my sister and brother-in-law to make sure they liked the plan.

step 2- buy and cut the lumber

Next, go to the hardware store and pick up the wood needed for this project. This will differ based on the height and width of the library and wall it’s going into. Below are exact measurements I used.
Lumber we Purchased-

Lumber Cut list-
- 2- 2″x6″ boards cut to the length of the room (ours is 153″) to build the base
- 16-2″x6″ boards cut to 8″ for bracing on the base
- 4- 2″x6″ boards cut to 79 1/2″ for the lower side supports
- 20- 2″x6″ cut to 8″ for bracing for the lower side supports
- 2- 2″x8″ boards cut to the length of the room (ours is 153″) to build the middle horizontal ladder support
- 16-2″x8″ boards cut to 8″ for bracing on the middle horizontal ladder support
- 4- 2″x6″ boards cut to 41-3/4″ for the upper side supports
- 12- 2″x6″ cut to 8″ for bracing for the upper side supports
- 4- 2″x4” boards cut to 6′-4.5″ to build the top support. We used 2 pieces to to span the length of the room.
- 8- 2″x4” boards cut to 8″ for bracing on the top support
step 3- build the base
First up, build one of the bookcases for the bottom section of the bookcase and one bookcase for the top section of the bookcase (a tall and a short one). That way you’ll have the correct depth for building the base. Just follow the included instructions from IKEA for putting the Billy bookshelf together.

We built the short one for testing sizes- it was easier to move the smaller one around too.

Next, remove baseboards on three walls- where the bookcase will be and the two adjoining walls. Set those aside until adding on the trim (once the structure is built and the bookcases are in place).
Why remove the baseboards? The front baseboard will be placed in front of the bookcase and will help it look super integrated into the room. The baseboards on the sides will need to be shortened to allow for the width of the new bookcase.

If needed, remove the carpet where the bookcase base will go. Pull back the carpet, remove the tack strip, pull out any staples in the floor and cut out the carpet pad. That way, the base can be built directly onto the subfloor and will be much more secure.

Now that the prep is done, cut 2×6 boards the same length as the room. Our room is 153″ so we cut that length of pieces for the front and back and 8″ long pieces for the cross supports.
Use screws to secure the base into the wall at the studs.

Place the supports between the front and back piece of the base and secure them into both pieces of wood with screws.
base supports

For our base, since we’ll have supports on the sides of the bookcases, we added in an 8″ support in the floor base for the sides.

We also added 8″ support pieces in the middle and the sides for each bookcase.

So where two bookcases sit next together, there are two supports for each bookcase. We want this to be as sturdy as possible!

The last- and really crucial step of creating the base of the IKEA Billy Bookcase Hack Library is to make sure it’s level. Since we’re working in a newer home, the floor was pretty level. Where it wasn’t, we added shims below the base to level it.

Once the shims were pushed in enough to level the base, the excess was cut off with a multi-tool.

Now the bookcase should sit level on the base.
step 4- lower side supports

Since the base is complete, start building the side supports. Cut 4 pieces of 2×6 the same height as the lower bookcases- 79 1/2″. Screw those into the wall.

Cut 16 pieces of 2×6 that are 8″ long for bracing for the side supports (8 for each side). Screw in 5 between the front and back piece of the side supports.

Screw in 3 of the 8″ bracing on the other side of the side supports. This is what the bookcases will connect to. Put one at the top, middle, and bottom of the side supports. Repeat for each side.
step 5- electrical

If needed, extend electrical outlets that’ll be covered by the bookcase. There was one outlet on the side that needed to be extended pretty far to still work through the side support. For that, we used a gang metal box cover with a cable clamp to route the wires to a new electric outlet box.

Use a jigsaw to cut out a hole in the backing. Tip- turn out the electricity to the outlets first before doing any electrical work.

Last, wire back on the outlet and replace the outlet cover.
We had one outlet on the back wall and all that was needed is spacers put into the back of the outlet and longer screws to connect to the box.

Again, use a jigsaw to cut the back of the bookcase. Put the bookcase in place and finish by installing the outlet cover.
step 6- connect the bookcases to the supports
Next, finish building all of the Billy bookcases for the lower level. We had 4 more we needed to build.

Put them on the base. Screw the side bookcases into the lumber supports. Screw the middle bookcases into the bookcase next to it. We did two screws under the top and middle shelf and one in the base to secure them.

If needed, add shims to the middle bookcase. Ours has an extra 1/4” on each side. The shims help it so it sits evenly in the center. Hammer them in until they sit flush with the front of the bookcase.

Cut the excess carpet by using a straight edge and a sharp razor.

Nail in the tack strip.

Push the carpet down over the tack strip.
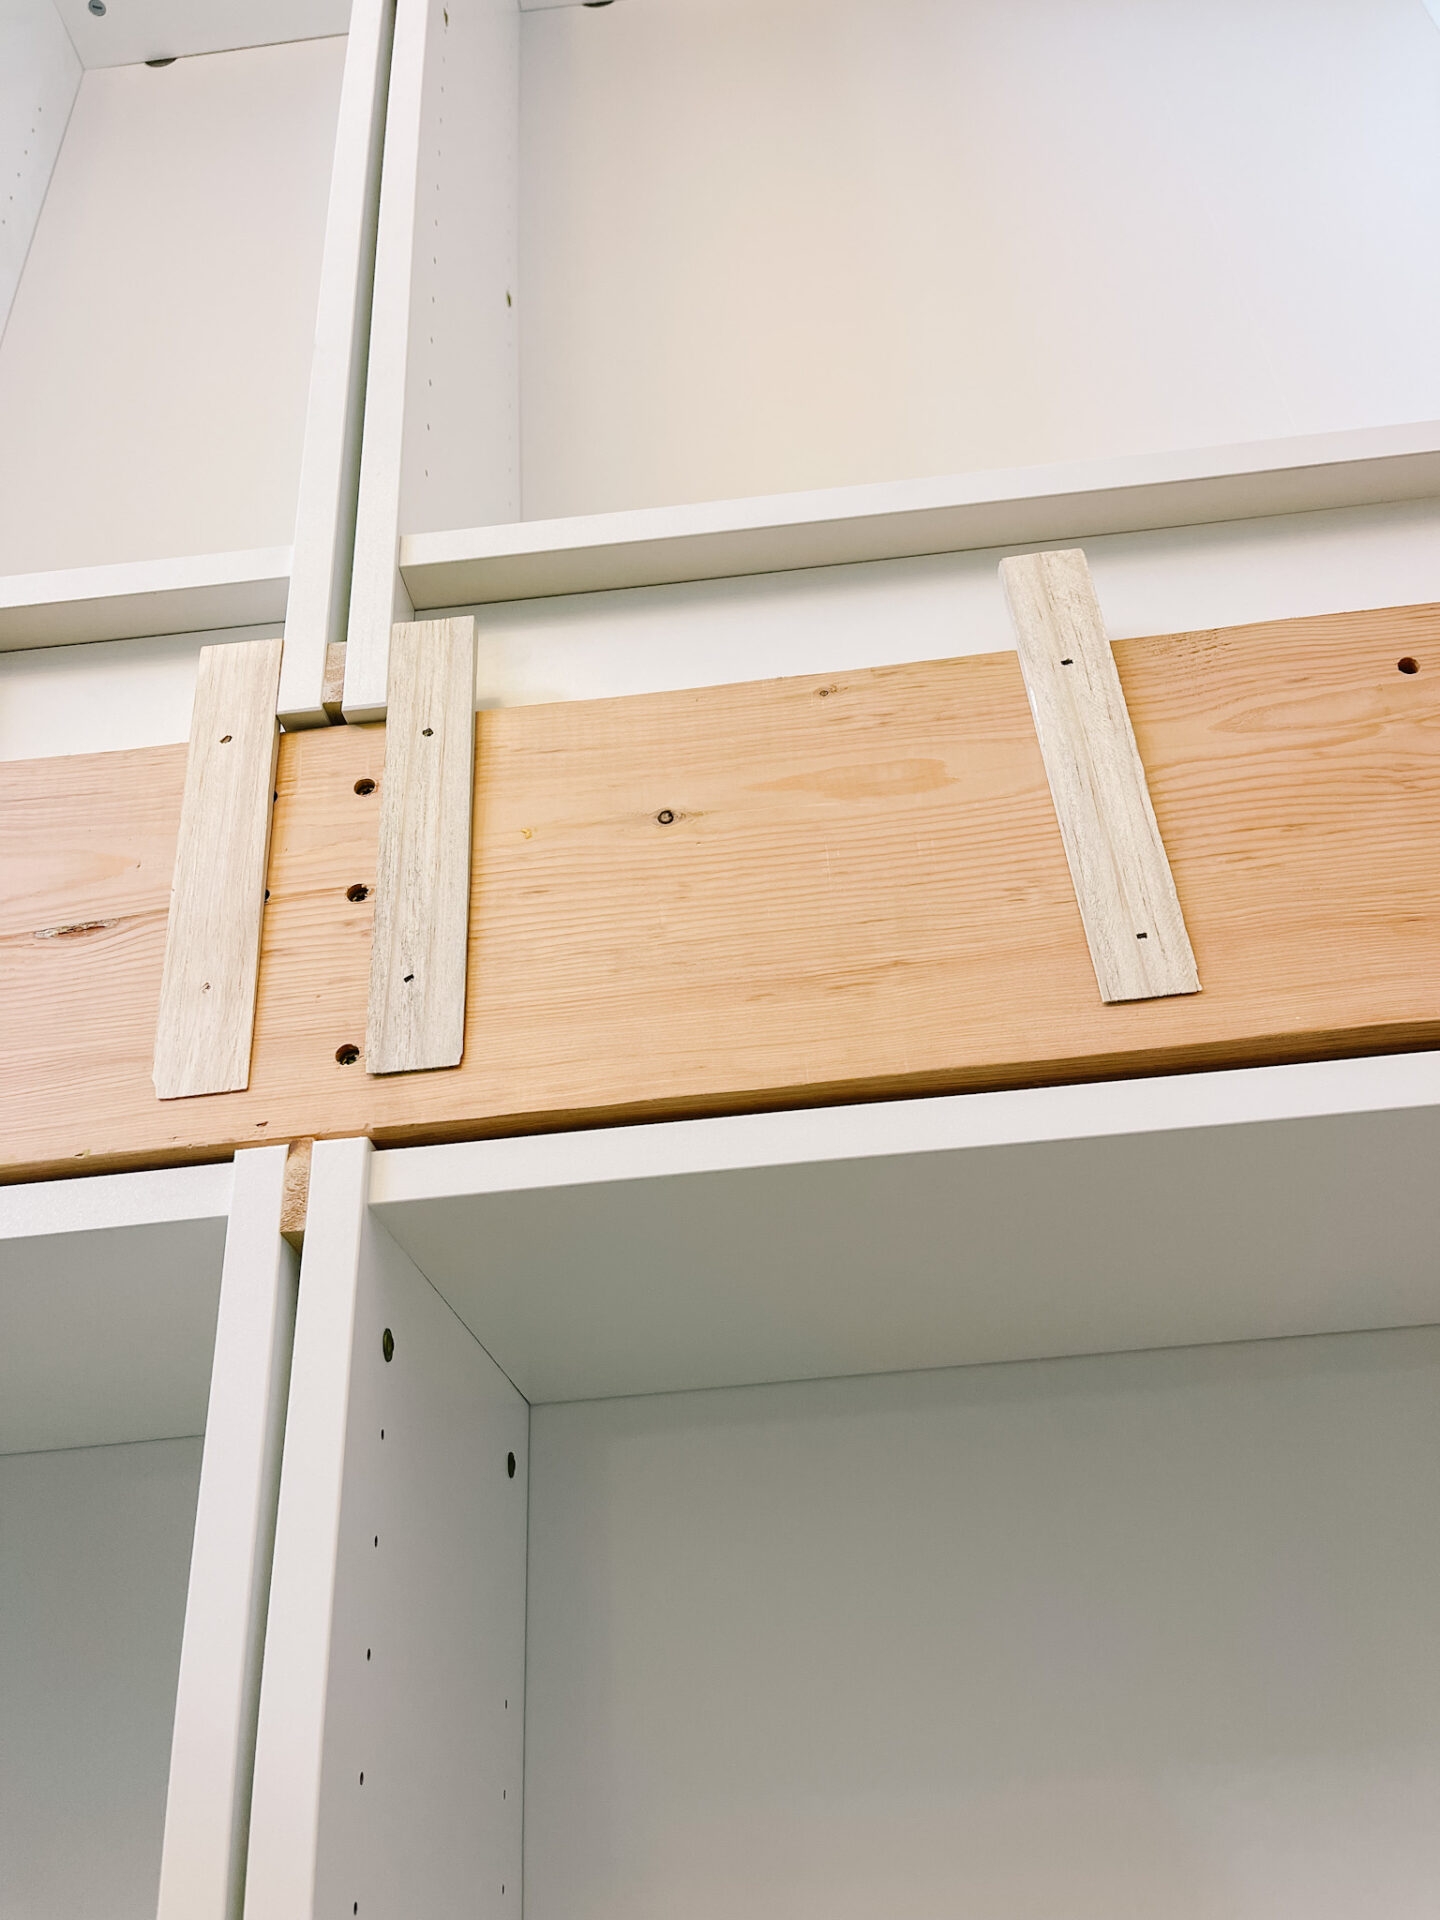
step 7- build the middle horizontal ladder support

Cut 2 pieces of 2×8″ boards to the length of the room. Ours is 153″. Screw the top support piece into the studs in the back wall.

Use anti tip hardware from the Billy bookcases to attach the top of the bookshelves to the back top piece of lumber. The bottom bookcases will be very sturdy by now!

Cut 16 pieces of bracing for the middle horizontal ladder support. These will be 8″ wide. Attach the front piece of the top bracing to the back piece. Then screw in the side piece to the back piece. If there’s a stud on the side wall, add screws into the stud. Repeat on both sides.

Next, add bracing to the middle horizontal ladder support. For that 16 pieces of 2×8 cut to 8″ are needed. Two for the upper side supports, 3 for the bigger bookcases (one on each side and one in the middle), and 2 for the small bookcase (one on each side).
step 8- upper side supports
Build the upper side supports. Cut 4 pieces of 2×6 the same height as the upper bookcases- 41-3/4″. Screw those into the wall.

Cut 12 pieces of 2×6 that are 8″ long for bracing for the upper side supports (6 for each side). Screw in 3 between the front and back piece of the side supports.

Screw in 3 of the 8″ bracing on the other side of the side supports. This is what the bookcases will connect to. Put one at the top, middle, and bottom of the side supports. Repeat for each side.

Next, finish building all of the Billy bookcases for the upper level. We had 4 more we needed to build.

Put them on the middle base. Screw the side bookcases into the lumber supports. Screw the middle bookcases into the bookcase next to it. We did two screws under the top and bottom shelf and one in the base to secure them.
step 9- build the top support

Cut 2 pieces of 2×4″ boards to the length of the room. Ours is 153″. Screw the back support piece into the studs in the wall.

Use anti tip hardware from Billy bookcase to attach the top of the bookshelves to the back top piece of lumber.
Cut 8 pieces of bracing for the middle horizontal ladder support. These will be 8″ wide. Attach the front piece of the top bracing to the back piece. Then screw in the side piece to the back piece. If there’s a stud on the side wall, add screws into the stud. Repeat on both sides
Next, add bracing to the middle horizontal ladder support. For that 8 pieces of 2×4 (or any scrap wood you have at this point) cut to 8″ are needed. Two for the side supports, 2 for each bookcases (one on each side).
step 10- trim

Now it’s time to transform the bookcase into a masterpiece! To begin, re-install the baseboards. The side pieces of baseboard will need to be cut shorter and then they can be nailed back into place.

To accommodate the height of our base, we added another baseboard on top it the original baseboard. This is installed upside down so the small parts touch and then there’s a base for the other trim that will cover up the seams of the bookcases. Note, when buying trim we choose 1/2” deep for everything so when the pieces are installed they’d be flush

There was a big gap between the baseboards and the bookcase because of the design of the Billy bookcase.

So we cut a piece of trim so it’d be skinnier and put it in the gap. That was nailed in place. Then it just needed a little caulk to finish it. Totally filling the gap with caulk would also be an option, but it wouldn’t look as nice.

more trim

Nail up the trim in front of the middle ladder support. We used 4 pieces since this is such a big area.
There were some sections where the wall came out and so the top bookcase comes out further than the bottom bookcases. So we nailed on shims first before attaching the trim

Once the horizontal center trim was up, we nailed in the trim that went over the lower bookcase seems. We also installed the side trim on the lower edges too. Where the two IKEA bookcases hit each other, you see the seam. That doesn’t look very nice so the trim is a great finishing touch!

Next was cutting and nailing up the crown molding. It was easy to cut since it was straight cuts on the ends. Nailing it up was a little tricky since the bookcase is so tall! It’s so much hotter up there.
Last we installed the trim that goes on the seams of the higher bookcases.

While my husband put up the trim, I caulked and filled holes with wood filler.
step 11- finish work
Now it’s time to do the finish work for the IKEA Billy Bookcase Hack Library!

We put stickers over the hardware and holes in the top bookcases. Note, on the shorter bookcases, IKEA puts holes and hardware on the inside below the top shelf. I’m sure it’s because they’re meant to be on the ground and since they’re so low, the hardware won’t be seen. But when they’re up high, they’re very obvious and don’t look great.

Sand any un-even trim so it’s all flat. Our middle section needed the most sanding.
Use wood filler to fill all nail holes. I recommend two layers of wood filler and then sanding them smooth. Use caulk on all seams.

Once all that is done, paint all the trim. Note, I used the same color on the trim as the baseboards. It doesn’t exactly match the IKEA bookcases. If I wanted to match the bookcases, I would’ve brought a shelf into the hardware store and asked them to match it. Once the bookcases are full, the color difference isn’t noticed at all.


step 12- the library ladder

The very last step of the IKEA Billy Bookcase Hack Library is building and installing the library ladder.

First up, I stained the pieces.

I used the stain color ebony since my sister wanted it dark so it’d coordinate with her floors and front door. I brushed on the stain and then used a rag to remove the excess stain.

Once that was dry (we waited two days), my husband put together the ladder.

Next, hardware was added to the ladder- the wheels and hooks.

Then my husband mounted the rail to the bookcase.

Last, the library ladder was attached to the bookcase. This was an exciting moment! It looked so good!

We put all the shelves in place and then added the books. Ready to see the after?!
after

After MANY hours of organizing and putting books on the shelves, the IKEA Billy Bookcase Hack Library is complete!

Isn’t the rainbow order on the books so satisfying?!

The library ladder is so useful! It’s very sturdy and it’s easy to reach every book on even the tallest bookshelf with it.

Can you imagine sitting here and feeling like there’s endless books to read? Especially on a rainy afternoon. That sounds like bliss to me!

This room also holds my sister’s piano. We grew up with that piano in our house so it’s super sentimental! A few years ago I helped her paint the piano this pretty blue color.

Anyway, I am SUPER proud of how this came together. Most of all I’m so happy that my sister and her family loves it. It was fun to bring her vision to life!
FAQ
I thought I’d answer some questions I’ve been getting frequently about the IKEA Billy Bookcase Hack Library.
how long did this IKEA hack take to create?

This project took about 60 hours. I’d say 10 for planning and prep and then the rest of the 50 hours was split across 6 days of building. These hours are with 2 people working.
I took good track of our time for this project. Here’s the breakdown on the work-
- Day 1- 8 hours- bought supplies for the frame, removed carpet under base, built base & side supports, & built 2 bookcases.
- Day 2- 7 hours- built 3 more bookcases. Extended outlets into bookcase. Attached lower bookcases to to the frame
- Day 3- 9 hours- Attached the top of the bookcases to the frame above them. Built middle supports, built top side supports, built 4 more top bookcases
- Day 4- 8 hours- bought trim, re-install the baseboards. Added trim to the front of the bookcases, some finish work
- Day 5- 8 hours- filled holes, caulked, added stickers to cover hardware. Stained the ladder, and painted the shelves
- Day 6- 9 hours- build the ladder, mount the ladder, organize books. Style books, and put furniture back in the room.
Note, I’m not a great builder (more of an assistant). If two people were skilled at building, we estimate that this could take 4 days to build and complete.
I need to say thank you to my sister and her family for watching and playing with Don. We could’ve never worked 8-9 hours a day on a build during the summer without childcare. My sister was so generous to cook for us and make it so we could bust out this project. Thanks Kate!
Why didn’t you go to the ceiling with the bookcases?
The walls are between 14-15′ high in this room. This is my sister Kate’s house. Her and her husband Jordan asked us to go to this exact height- they wanted the top of the bookcase to hit the bottom of the window on the other wall. The ceiling slants at the top of the wall and they were concerned about how the bookcase would look right against the slant.
And, of course, having books up any higher would’ve meant we needed a custom library ladder which would’ve been expensive. They have young kids so I assume they don’t want their kids to be able to climb much higher either.
After working on the bookcase up 12′ high, I am grateful they didn’t go higher. It was very hot that high and working on a ladder any higher would’ve been tricky.
How are you going to find books when they’re arranged in rainbow color?
I organized the books in rainbow order because it’s beautiful and my sister asked me to.
Here’s the thing- everyone’s brain works differently. Some people remember the author or title and organize their books alphabetically. Other people keep their books arranged by subject. And then there’s super visual people like me who organize their books by color because they can remember the color of the spine and/or where on the shelf they put the book.
The pretty way is also a great way to organize books! I’ve heard from teachers and librarians who organize books by color for children because they can find and return books faster when they’re color coordinated.
I know that people like to be pretentious about books and say there’s a right and wrong way to arrange them. Or only “serious” readers organize their books in the correct way- by subject or author or Dewey Decimal system. But in your house, organize them how works best for you. If it’s rainbow, let’s be friends 😉
did you keep any series together?
Yes! Any series my sister had, she asked me to keep them together. There’s a section for Harry Potter, Wayside Stories, Junie B. Jones, and a few sets of encyclopedias. If you look closely at the pictures you’ll see them. Because the books are overall organized by color, they blend in.
where did all these books come from?

My sister already had a good collection. She also thrifted some books for the shelves.
A bunch of books were gifted to her by a friend’s neighbor who was downsizing. There were lots of great books in that collection! The books that my sister isn’t a fan of, she can slowly replace as she finds new ones she loves to add to her collection.
It was fun to be able to completely fill the bookcases! I’m grateful for all the books because we got a big beautiful look from it! But the collection will be refined with time, I’m sure.
will all these books get read or sit and collect dust?
My sister is a reader and so is her family. Like I said, some books are probably place holders. But I think lots will get read.
And also, what if they aren’t? Is it such a bad thing to have books surround you like art? I know in my library I feel like all the books fill the room with ideas and that anything I need to reference is at my fingertips. It’s really beautiful!
how many books are there?
From the pictures, I counted the books and I estimate that there are about 1000 books in the library shelves.
I’ve read that some people say that for a home to be considered to have a library, you need 500-1000 books minimum.
how does the ladder handle the carpet?
The ladder goes great on the carpet. You kind have to pull at the ladder for it to move, but that’s because there’s grippers on the top of the ladder so it doesn’t glide. I’m guessing the manufacturer wanted the ladder to stay in place and not glide for safety reasons.
are you worried about dust?
No- but this isn’t my house.
Whenever I do a new project with a lot of “stuff” someone always is concerned about the dust. Not me! Sure I dust sometimes, but I’m not a clean freak so a little dust doesn’t bother me.
Dust will happen no matter what, might as well surround yourself by what you love!
are those fake books? Did you use custom book covers?

All the books are real! I take that back. One book is wood with a hollow inside- perfect for hiding things. No custom book covers were used. It’s just the color of the spine that you see. Since they’re arranged in color coordinated order with (mostly) the dust jackets removed, the color is really vivid.
was there HVAC on that wall you had to deal with?
No, luckily there were no vents on the wall for the bookcase for heating or cooling. We didn’t have to deal with that issue thankfully. But if you’re doing this project, make sure to check before you begin and come up with a plan for rerouting them or working around any vents.

Thank you for reading! If you have any questions about the IKEA Billy Bookcase Hack Library, please let me know in the comments.
 This post contains some affiliate links for your convenience. Click here to read my full disclosure policy.
If you love it, pin it!


So beautiful and inviting! Would definitely love to have one of these eventually!
Incredible! When I saw it on Insta I was curious how you got the ladder to be secure with the Billy bookcases. So cool, very thorough!!