
Any other small dog lovers out there?! We love our pups, but jumping on the bed is a little tricky for them. We had a bunch of scrap wood from other projects so we decided to make them some dog stairs to get in and out of bed easier.
The first night we finished these steps, I was pleasantly surprised that both our dogs could easily use it! Isn’t it the worst when your dog whines to get in bed in the middle of the night?! This completely eliminates that issue.
I wanted to share a DIY for making these stairs today. Here’s what to love about it- its simple! The only cuts are straight ones, so if you can use a saw, you can do this. You can use spare wood to make it. Lastly, it will help you (and your dogs).
diy dog stairs tutorial
Supplies:
- 1 1/2″ thick wood. You’ll need 36″w x 12″ h
- 1/2″ thick wood. You’ll need 2′ w x 2′ h
- Drill
- Safety Glasses
- Tape Measurer
- Saw
- Chalk Paint (color “Drop Cloth” by Dixie Belle)
- Paint Brush
- Rug
- Ribbon
- Glue Gun
- Staple Gun and Compressor
- My free stairs plans (located in the resource library—get the password to it free by filling out the form at the bottom of this post)

tutorial
step 1- download the plans
First, download my free DIY dog stairs plans from my resource library—get the password to the library for free by filling out the below form:
step 2- cut the wood
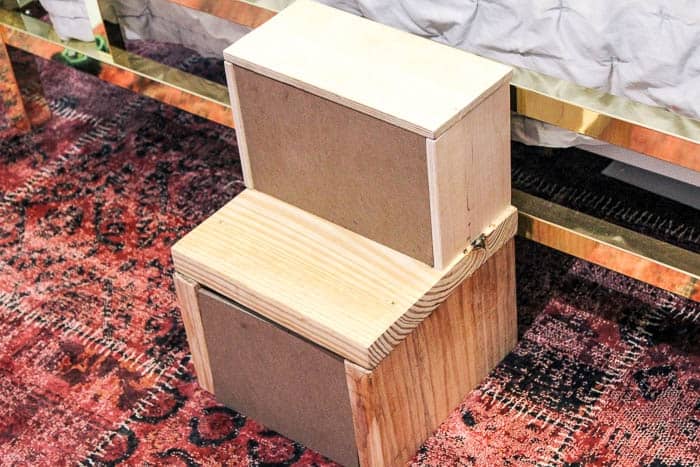 Next, mark your wood according to the plans cut out your pieces! Remember, measure twice and cut once. Dry fit the pieces together to make sure everything fits nicely.
step 3- attach the first pieces of wood
Attach the two E pieces (the top, skinnier boards) to piece C with screws. Next, attach the two F pieces (the bottom, thicker pieces) to piece C with screws.
step 4- finish screwing in the rest of your pieces
Use screws to finish putting the stairs together. The back and bottom of the stairs are open. This keeps them lighter so you can easily mover them around.
step 5- paint
Paint the ends of the stairs. Extra points if you fill the seams with putty and screw holes (I should have done this for a more finished look).
step 6- Cut a piece of rug 
Cut a piece of rug or thick fabric to 13” long x 29.5” high (includes 1/2″ seam allowance on each end). I bought a rug from Target that is the perfect thickness for this project! I just wish I had picked a rug without any white in it #dirtydogpaws
step 7- sew a hem on your rug

Sew a ½” hem on your rug on each side. If you don’t have a sewing machine, you could also fold your rug over and staple it down.
step 8- Use a staple gun to attach your rug to the stairs

Staple the rug onto your dog stairs. I thought I would be done at this step, but I hated seeing the staples on the edges. If this doesn’t bother you or you choose a darker rug where they don’t show up as much, you can skip the next step!
step 9- add trim to cover up the staples
Hot glue ribbon to the edges if you want to cover staples/ make a decorative edge. I wish I had used a less bright color of ribbon, but I am happy with how it finishes up the stairs!
after
And now you have the cutest dog stairs! Plus, your dogs can help themselves into the bed!!!

I love that this project is so customizable- paint and rug choice could greatly change up the look! If you end up using my plans to make this, I’d love if you’d tag me on social media with #athomewithashley!
Remember, if you want the free plans, just fill out this form!
 This post contains some affiliate links for your convenience. Click here to read my full disclosure policy.


Very cute. Your doggies must love them. They didn’t look too hard to make either. I see in your photos that you had a wonderful helper on the job. It is great when you can get children in on a project. Helps both you and them.