When my son was little (less than 2!) I made him a DIY play kitchen from a $10 piece of thrift store furniture. It turned out so cute and we played with it until we moved. It was broken in a few spots so we didn’t take it with us. 
Now, almost 2 years later, my son has been begging for a play kitchen again. Since we’ve been working on our playroom, I figured the timing was perfect! This time, I took what I learned from the last one and improved it!
Side note, in case you’ve missed any of the playroom posts, you can catch up here-
tiger wallpaper installation / how to create a mood board / how to paint walls super quick / how to lay laminate floors / how to make a Kraft paper roller / how to install baseboards / how to caulk / how to install a shiplap ceiling / DIY Dress up rack
how to make a diy play kitchen
Let’s start with the video tutorial so you get an overview on what I did. Then, I’ll dive in with more details below:
If the video doesn’t work here, you can watch it on YouTube here. P.s. I’m trying to build that page up, so if you’d subscribe, I’d really appreciate that!SUPPLIES
- an entertainment center from the thrift store (ours was $8!)
- chalk paint- I used fluff white for the top and sea glass for the bottom
- top coat- I used gator hide
- wood circles for the burners
- hole filler
- slick stick
- spade bit
- peel and stick floor tiles (I got 5 of the Carrara marble ones)
- construction adhesive
- brass faucet
- stainless steel bowl for the sink
I spent about $70 in supplies for this project.
step 1
Start by finding an entertainment center from the thrift shop. This one was $8! I was looking for something with 2 doors, an opening for a DVD player (that lower level works great for a short sink for my little guy). I wanted it to be made fo real wood so it’d be easier to paint. I also like that it has some good details- the trim on the doors and base is pretty to me.
On the downside, it was missing its hardware and the door was cracked (that’s why there’s tape on it).
step 2
Next, its time to deconstruct! All of these instructions are for how I did mine and I’m hoping its helpful. We took off the trim on the top and then took off the whole top with a hammer.
For the next phase of deconstruction, the back was removed (it wasn’t sturdy enough). The bar across the front was also removed.
step 3
And now, fill the holes for the hardware if you’re planning on using a different size than what was originally there. I used this DAP spackle and it worked really well!
step 4
Next, I started priming the sink so I could paint it. I don’t love stainless steel sinks, so I thought it’d be fun to make it gold! If you want to paint something slick, I always recommend slick stick for a primer.
While painting, give wood circles a coat of black paint so they look like burners.
step 5
Cut a board for the back of the play kitchen. I made mine so that the top is the same on all three sides and it goes to the floor. Use screws to install.
step 6
Trace your sink and faucet with a pencil on the top of the play kitchen. Use a drill with a spade bit for the faucet holes. Then, use the spade bit to drill a pilot hole for the sink. Switch tools to a jig saw and use that to cut out the faucet hole.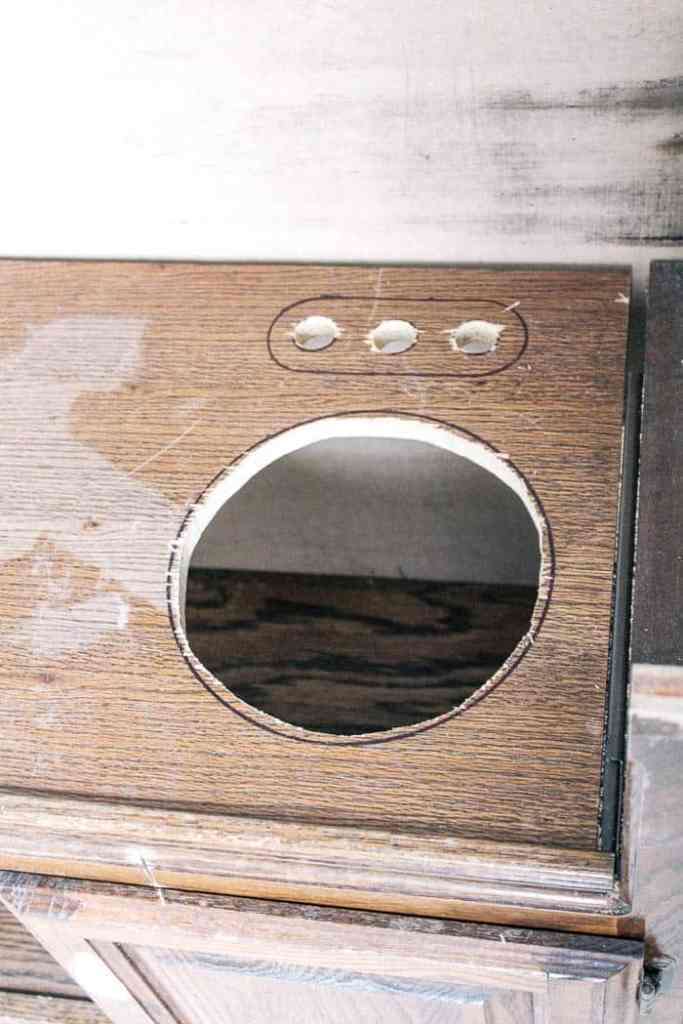
step 7
Now its time for painting! First, prep by sanding any rough edges until they are smooth. Secondly, give the whole piece a really good cleaning. Finally, let’s paint! I painted the top half fluff white.  Next, I taped it off, and then painted the bottom sea glass. For tips on painting a super perfect line without any bleeds, see this post.
Paint cabinet doors as well.
Once the paint is dry, give it a thin top coat- I used gator hide
step 8
Now let’s work on the backsplash. The cheapest why I’ve found to do this, is to use peel and stick floor tiles. The sheets are $0.93 each and I only needed 5. I used a paper cutter to score them. I cut the tiles down to 2″x4″ pieces.
I had the brilliant idea to install them in a herringbone pattern. It took fooooorever! So I’d recommend just putting them up in a brick pattern to save literally hours. It was really complex to figure out the angles, so I’m not going to explain how to do. I don’t recommend it, but it did turn out beautifully.
Note, these aren’t that sticky so it’s important to use construction adhesive to adhere them. They’ll fall off sooner of later without it, so it’s better to install them with the glue.
step 9
For the countertops, I painted them to look like marble. I used these exact instructions for this step.
Finish the project by installing everything. I glued in the sink and burners. The brass faucet was installed like a normal faucet. If you’re looking for a super cheap faucet, I’d suggest going to a Habitat for Humanity store- it’ll be less than $5 to buy one there!
I added brass handles. For the front of the cabinet doors, I put on peel and stick wallpaper that is leftover from the mural in the room.
after

Here is how it turned out. I love the gold touches with the blue and white!

The herringbone backsplash is probably my favorite detail! It took forever to do, but it sure is pretty!


I almost left the sink white. I’m so glad I went with gold! Both for aesthetics and I think it will stay clean looking for longer.


I also think the touch of wallpaper is fun too! Insides holds some play food, dishes, a wood toaster, and a mini hand towel. I love that we have a place to store the food! My son had had so much fun playing with it! Win win!
 This post contains some affiliate links for your convenience. Click here to read my full disclosure policy.
If you love it, pin it!

Such a cute play kitchen! Would you mind putting the total cost of the project?? I know it will vary, but ballpark estimate would be helpful!
Sure! I had some supplies on hand. So for me it was $8 for the entertainment center, $50 for the faucet (I splurged there- you can get one for $1 at the Habitat for Humanity), I had the paint on hand, burners were $3, knobs for the oven were $2, backsplash was $6, stainless steel bowl for the sink was $1. My total was $70 for this project. The last time I made one a few years ago, the total was similar. But if you get a cheaper faucet it could be closer to $25.
This is one of the prettiest play kitchens I’ve seen in a long time. Wow, great job! Pinned 🙂
Fabulous makeover!!!
Super cute transformation. I would have loved to have had this cute kitchen. Happy Crafting, Kippi #kippiathome