It was 88 degrees here in Utah today and so it still feels like summer, which I’ve been loving. I also adore the fall weather, but fall means winter is right around the corner which is not my favorite. Anyway, even though it doesn’t feel like fall, I decided to get my porch decorated for fall and thought I’d share the process! Have you ever been on Pinterest and seen those amazing front porches and wanted one too? I decided to create my own dream front porch. 
Supplies for the mason jar wall hangings:
- mason jars
- wood plaques
- hose clamps
- gold spray paint
- twinkle lights
- painters tape
- metal drill bit
- wall hangers for siding
- hooks for the back of the plaque
- white spray paint

how to make mason jar wall hangings
Start out with your wood plaques. I made a total of 6 of these. They come ready to paint.
step one- paint
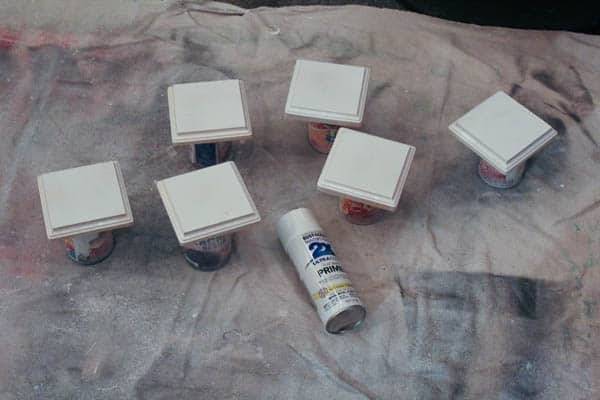
I placed cans under the plaques so they wouldn’t stick to my drop cloth. A few light coats of white spray paint will cover these nicely
I covered my mason jars with blue painters tape so that I could have a base of gold paint.
Outside, I took my mason jars and hose clamps and gave them a few coats of gold spray paint. To stay on a budget, I choose the least expensive spray paint I could find and really liked this one!
Remove your painters tape to reveal a beautiful paint job!
step 2- assembly

Now that everything is painted, its time to assemble. First, attach your d rings to the back of your square plaques. This is how your wall hanging will hang to the wall.
Make sure to use a measuring tape so the hanger is hung in the middle.
Next, you’re going to drill a pilot hole for where the screw will hold the hose clamp on to the front of the plaque.
You have one more pilot hole to drill. This time, you will need a drill bit that goes through metal so you can attach the hose clamp to the wood plaque. I used the back of my plaque as a support for drilling this hole. I’ll be honest, this is the hardest part of this whole DIY- it takes time and muscles to get through the metal!
When I made my pilot hole, I essentially made one of the openings bigger so that I could get a screw through.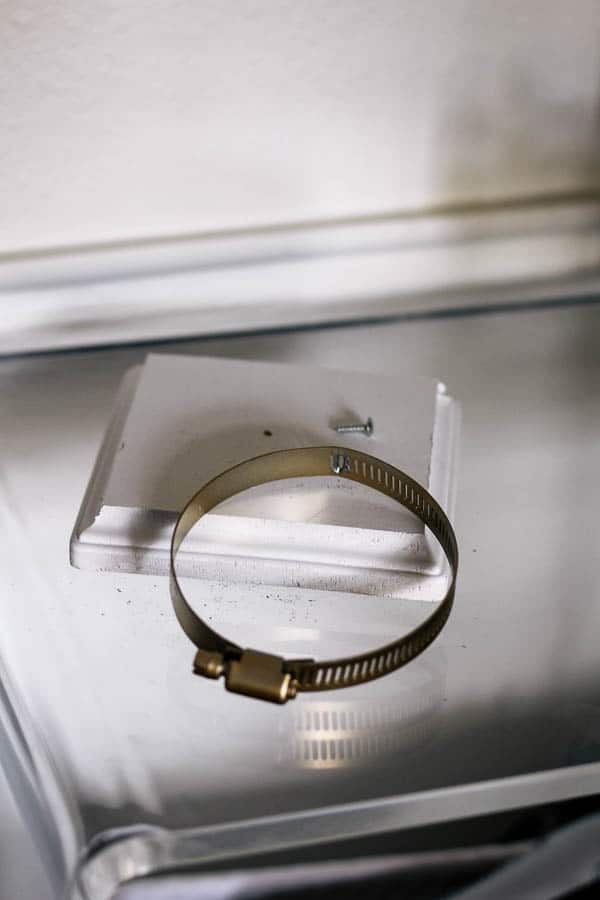
Now that you have all of your holes all drilled, you can add your mason jar to the plaque! Use a small screw to attach the hose clamp to the wood plaque.
Then, tighten up your hose clamp around your mason jar!
step 3- hang

Guys- I have figured out the BEST way to hang anything on vinyl siding! I have used these siding hooks for art, bbq tools- and now mason jars! You just click this under the siding and you can hang damage free!
Here is what the hook looks like. Just click the rounded top part under the siding and its ready for hanging!
Add your twinkle lights (these are battery powdered) inside your jar and you have a completed DIY! The lights makes it look like you have fire flys in the jar and totally up the magical factor!
fall front porch- after photos!

I also added in some large mums from Home Depot and some pumpkins. The white ones are fake from Michaels. The green ones are real and from the farmer’s market. Helpful hint- if you want pumpkins early the grocery store most likely won’t have them so farmers markets are the best place to find them.


Lucy (my dog) was outside while we took pictures and she was working it for the camera- haha! How did I luck out with a dog who loves getting pictures taken?!


I also upgraded my front porch mat. I grabbed this home sweet home one and it was on major clearance- $6 in store!!!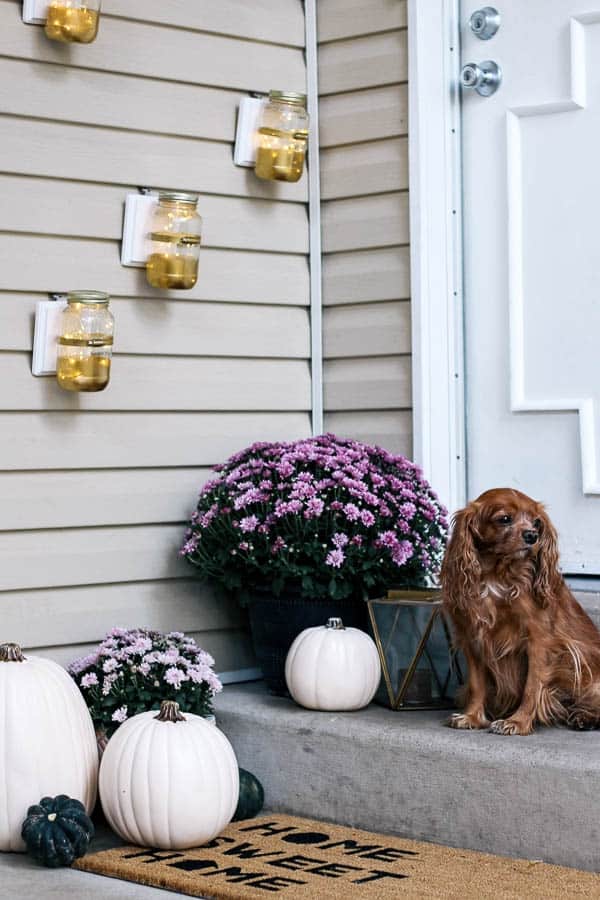


For the last finishing touch, I bought out this lantern from Anthropologie.
I am so excited with how my front porch turned out! It feels so festive when I walk outside and makes such a welcoming first impression. I hope this Mason jar DIY was inspiring for your fall projects!
shop this post


This post contains some affiliate links for your convenience. Click here to read my full disclosure policy.
[…] that it is officially fall, I think I am now ready! My front porch is still looking super cute and now I have our decor up! I hope that these printables are helpful […]