 A few weeks ago, I popped by an estate sale in my neighborhood. It was a good one! I grabbed lots of little books and also snagged a $5 little waterfall cabinet that was in rough shape. I’ve been wanting to try some new (to me) techniques on furniture. I figure, you might as well have some fun since you’re already painting! For this piece, I tried painting it ombre.
how to paint ombre furniture
Let’s start with the video tutorial so you get an overview on what I did. Then, I’ll dive in with more details below:
If the video doesn’t work here, you can watch it on YouTube here. P.s. I’m trying to build that page up, so if you’d subscribe, I’d really appreciate that!SUPPLIES
- Mint Julep chalk paint
- Farmhouse Green chalk paint
- Fluff chalk paint
- A paint brush for each color
- Spray bottle
- Rags
- Boss primer
- Clear Satin top coat
- White lightning Cleaner
- Leaf molds
- Clay/Modeling material

step 1- Prep
My little cabinet was extra tricky because of the bad shape it was in. The entire thing had been covered in shelf liner that I peeled off. Next, because the table had some paint peeled off and was bumpy., I gave the whole thing a good sanding. Then, I cleaned the cabinet with white lightning– even the bottom full of old spiderwebs. It was nasty!
For the last step of prep, since it smelled like cigarette smoke, I gave the whole thing two coats of Boss primer to block the smell. This worked great! It didn’t smell at all after the second coat. Boss also works really well for preventing wood from bleeding.
step 2- Molds
And now, I started making leaves for the drawers. This step is so fun and simple! I just put the clay into the leaf molds. Then I popped them out and put them onto a piece of paper to dry. They take awhile to dry, so it’s best to start this process early.
After the leaves were dry, I used construction adhesive to adhere the dried molds onto the drawer front.
step 3- Paint
Next, it was time to paint! Since I wanted to do an Ombre or gradiant look, I started by painting the cabinet 3 different colors- mint julep on top (the darkest), farmhouse green in the middle and fluff white at the bottom. I went from darkest at the top to lightest at the bottom because I wanted the drawer (where the leaves are) to be green.
Chalk paint always needs two coats of paint, so I once again painted the cabinet 3 colors. I also painted the molded leaves mint julep to march the drawer fronts.
step 4- blending
The trickiest part of this makeover was the blending! But I was ready to get rid of those stripes, so what I did was mix the mint julep with the farmhouse green in a disposable bowl. Tip- you always want to use a different container for mixing so you don’t contaminate your paint colors in the original bottles.
After the paint was mixed, I started painting it on between the stripes. Tip- only paint up and down (vertically) to assist with the blending. To blend, it worked nicely for me to spritz the piece with water from a spray bottle before and after painting. Then, I’d use an old paint rag to blend the paint. Just be careful because too much water can create drips.
Making this cabinet have an ombre finish was a long process. And a little stressful! I really wanted it to work, but with chalk paint you only have 10-20 minutes to do blending before the paint is dry so you have to work fast. I kept layering on paint and blending until I liked how it looked.
step 5- top coat
Finally, to finish up the piece, I gave the whole thing a clear top coat. This works to protect the furniture and make it easily cleanable. Super important in a play room!
after

Ta da! Here it is in all of it’s green glory! My son’s favorite color is green so he was excited for this piece. I had plans for it to go on a wall in the playroom so I choose the colors with that in mind.
Look how cute the cabinet is in that corner!!! I LOVE it! I was a little worried the ombre was a little crazy, but you only see the front from here so it’s pretty subtle, especially accessorized.
Here’s a close up of the leaves- they add a fun pattern and coordinate with the wallpaper.
This corner didn’t have an end table, but junk just piled up over here. Now, it’s nice to have a spot to store some baskets that house toys. Yay for organization!
There you go! My first ombre piece! I’d love to try one that goes from pink to mint. Maybe one day! Would you try painting a piece of furniture ombre?

 This post contains some affiliate links for your convenience. Click here to read my full disclosure policy.
If you love it, pin it!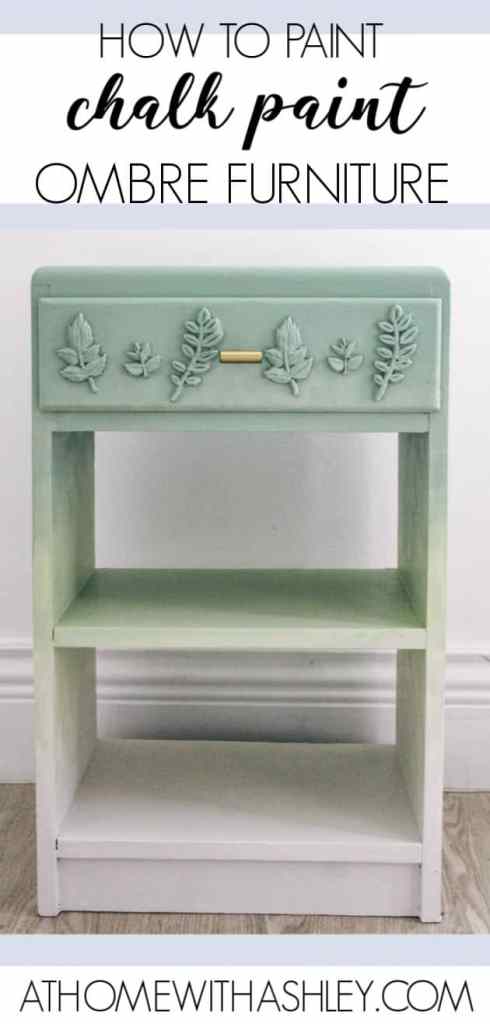
So pretty, Ashley! Love those leaf accents… and the color looks great in your room! I’m here via Morning Cup… would love to have you link-up at the newest party in town… Tuesday Turn About. We start this coming Tuesday at 5pm CST! Hope to you see you there!
I love it! It’s a great mixture of colors that you chose. If you’re interested in joining another link party we just started a new one today! Your content would be perfect for it 🙂 Here is the link https://handmadeweekly.com/handmade-otherwise-link-party-week-1/