
I was thrifting the other day and spotted the cutest grandfather clock. Well, it was it was the shell of one because it was missing the actual clock part. I didn’t buy it at first- even though it was only $25. But I fell in love with it and luckily it was still there when I checked the next day! Now I want to show you how I redid it and my finished painted grandfather clock.
painted grandfather clock
Let’s start with the video tutorial so you get an overview on what I did. Then, I’ll dive in with more details below:
If the video doesn’t work here, you can watch it on YouTube here. I’d be over the moon happy if you subscribed to my YouTube channel! Videos are actually released on YouTube first (usually the night before they’re published on the blog). Thank you!
SUPPLIES
- Grandfather Clock
- TSP
- Slick Stick
- Beloved Pink (50% lighter)
- Clock kit
- Clock surface
- Rainbow paint colors- 1. Beloved Pink, 2. Shy Smile, 3. Coral Fountain, 4. Lamplit, 5. Corn Stalk, 6. Frittata, 7. Sparkling Brook, 8. Green Aqua, 9. Mirador, 10. Tinted Ice, 11. Early September, and 12. Blue Chalk

I bought the clock for $25. Then I paid $19 in parts to restore the clock. This project cost me $44. Not too bad for a grandfather clock!
before

Here’s how the clock looked in the thrift store- missing a scroll and the clock. Maybe someone wanted to repurpose it? When we got it home, I was really excited to find the decorative piece of wood for the right side in the back of the clock!
step 1- prep


Fix any damage. Since this clock was a little beat up, I used wood filler to fill cracks, holes where the veneer had pulled up, and in the deep seams. Once the wood filler was dry, I sanded it down to a smooth finish.

Clean the clock. Mix 2 Tablespoons of TSP in 1 gallon of hot water. Use a rag dipped in the solution to clean the entire surface of the furniture you’ll be painting. Wipe the piece clean with a damp rag to remove any White Lightning residue. Let dry prior to painting.

Lay a drop cloth on the floor. Put a towel or drop cloth on the floor underneath the furniture you’re about paint. This will protect your flooring from paint drips.
step 2- prime

Since the finish was slick (a smooth veneer), I primed. I used one coat of Slick Stick to prime the piece. I let that dry throughly before continuing to paint.

This will make it so the paint will adhere to the clock without sanding.
step 3- paint

And now, paint the clock with two coats of paint.

I removed the door for the clock and the hidden storage and painted those separately so they didn’t stick to the clock while painting.

On the glass door, I didn’t worry about getting paint on the glass. Once it dried, I just used a razor blade to remove any excess paint.


step 4- repair the face

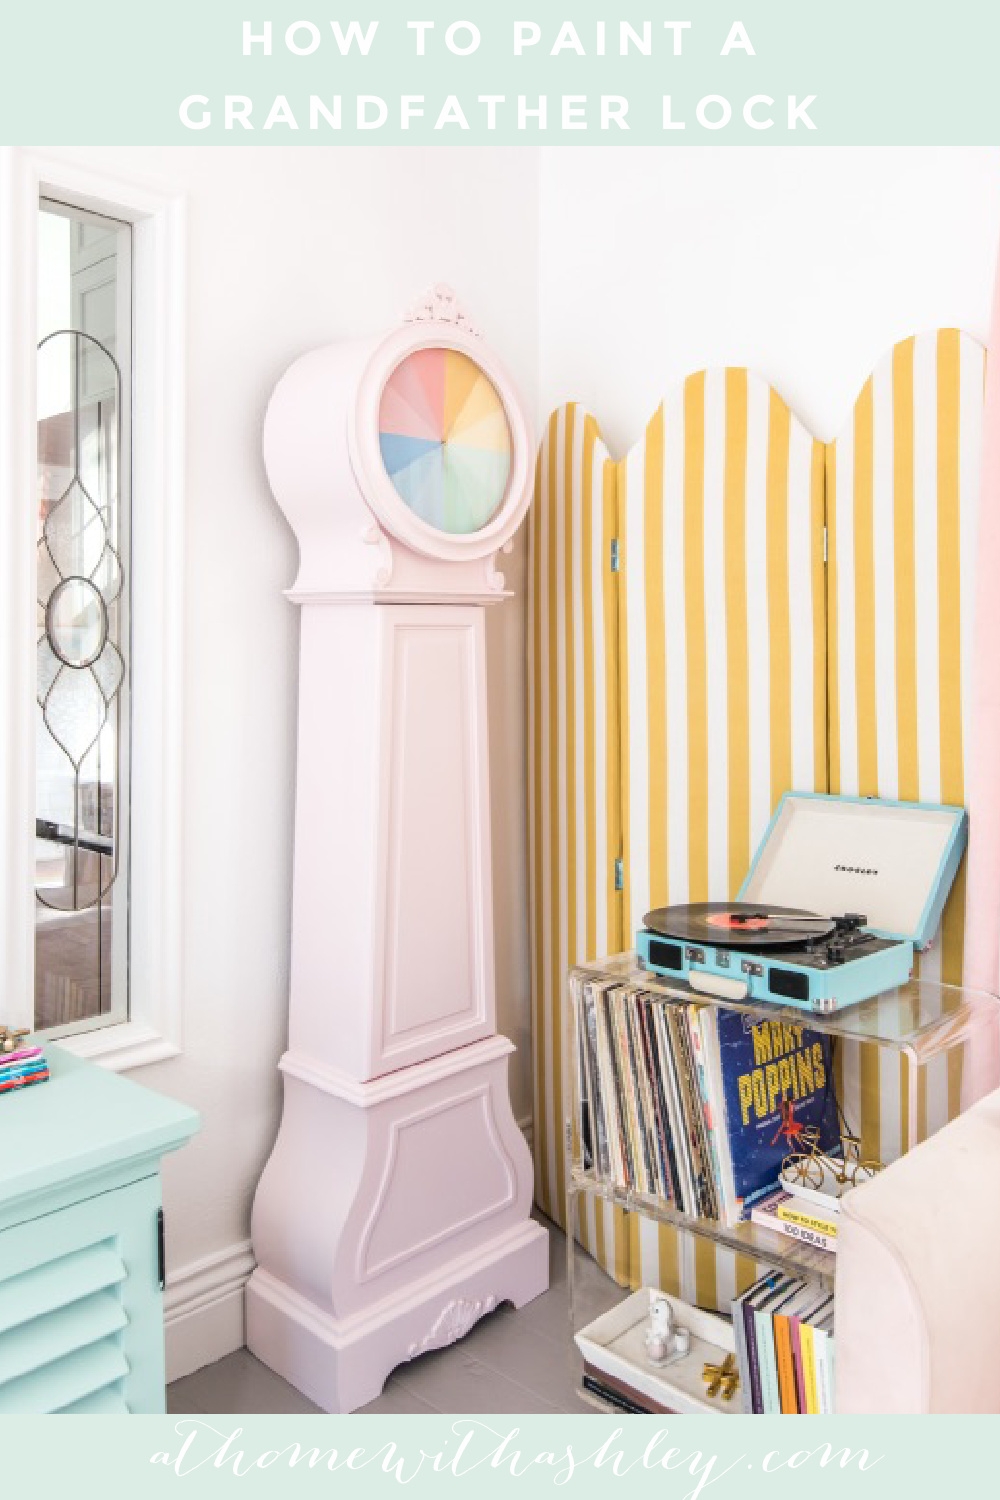
Finally, it was time to work on the face of the clock. I thought it’d be fun to do a color wheel so I divided the clock face into 12 equal pieces. I used a ruler and a pencil. First, I divided the clock into half, and then 1/4s, then divided each 1/4 into 3.

Then I carefully painted each of the triangular pieces a different color. I created a pastel rainbow color wheel and love the soft colors all together!

Then the clock kit was used to make the clock actually work. The new face was put into place and we now have a working clock!

after


This was a really fun project because it took a discarded item and gave it new life. The bones on this piece were beautiful and it was really gratifying to make it pretty once again.


Plus I didn’t have to feel bad about “ruining” a vintage clock since this one was so damaged.

And now I love it! It’s sweet and pink and the face it just so cute with the rainbow! I love how it looks with the rainbow art on the other side of the sofa.

Would you decorate with a grandfather clock?
 This post contains some affiliate links for your convenience. Click here to read my full disclosure policy.
If you love it, pin it!


This turned out so cute, I love how you transform everything into exactly what you want it to be!! And it’s always so happy and cheerful!
So adorable and happy!