
I’ve been on a kick of making Anthropologie dupes. I love their stuff, but it is SO fun to make a version of my own. This week, I spotted an amazing picture frame for $24. I thought that I could make one from a thrifted frame, so I set out! Here’s how to make a DIY fabric picture frame.
how to a diy fabric picture frame
SUPPLIES

- Picture Frame. Mine was thrifted for $1
- Fabric. I got 1/3 of a yard of pink faux suede for $4 and it was more than enough.
- 1 piece of felt
- Pliers
- Scissors
- Hot Glue Gun and Glue
- Moon and Stars charms I spent $2.99
step 1- create a padded wooden frame

Start by removing the backing and glass off the frame. The frame can be from a craft store or you can get one thrifting like I did. Make sure that the frame is flat and wide. Put the frame face down on a piece of felt or a piece of batting. I used the frame to create a template for 4 pieces of felt to cover the front and sides.

After the felt was cut out, I used a hot glue gun to attach it to the frame.


This will give the frame a softness and makes it so that the details of the frame don’t show on the fabric. Essentially, it’s like upholstering the picture frame.
step 2 apply fabric

Next, cut the fabric in a rectangle about an inch larger than picture frame on all sides. Center the padded frame onto the fabric. Start hot gluing on each of the four sides of fabric onto the frame.
For this project, select non-stretchy fabric. I used 1/3 yard of fabric. Anything from 1/2 to 1/4 yard of fabric should be enough for most frames.

Here’s WHAT NOT TO DO– don’t glue down one side, cut the middle, and then glue the inside. If you do, you’ll probably end up with inside corners that show the felt and look horrible.

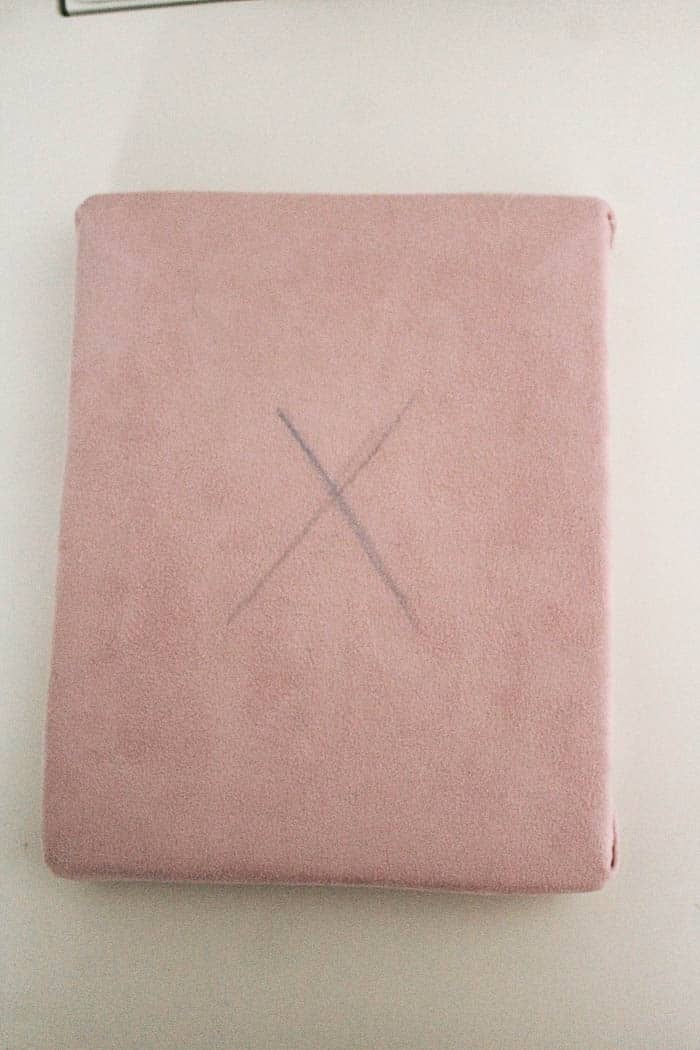
Instead, DO THIS hot glue the fabric onto the frame. Do each of the 4 sides, making sure to pull the fabric taught as you go. When all four sides are glued on, draw an X on the front of the fabric. 
Cut that X with scissors. And go closer to the frame, but be careful to not get too close. Pull each side over the edge of the frame and hot glue it in. Note, because of the nature of this method, the corners will be slightly rounded. Which is better than showing the layer below it.
The back might not be pretty, but the front looks pretty cute!
step 3- add charms

And now take some charms for two corners of the frame. I didn’t like that these had loops at the top, so I snipped those off with pliers.

Then I simply hot glued them onto the frame. This is by far the most fun and easy step of this project!
after

And here is my finished up frame! It looks so cute on my nightstand. Wasn’t that wallpaper just begging for a pink picture frame?!

I don’t have a ton of personal picture in my house, so this sweet one of Don and I last Easter feels special to have up.


Anyway, there’s my Anthro dupe project. I spent between $9 and $ 10 on this project. Which isn’t too bad when you’re dealing with a custom frame! I love that you could use infinite numbers of fabric and charms. Customization gets me going- lol. Would you try this? Do you like this pink frame?
 This post contains some affiliate links for your convenience. Click here to read my full disclosure policy.
If you love it, pin it!

This reminds me of when I was a kid. I havent seen this style in forever. But so cute. Gives it a fun and colorful vintage flair. I think this is a must on my project list. Thanks for sharing!
So pretty! The charms really finish it off well. But your dog is even prettier!! 😂 I wish I could have just a tiny piece of your talent. 😄