
I was at the hardware store last week, getting some paint, and I spotted a pack of quart paint stirrer sticks- basically oversized popsicle sticks. I saw the shape on top and thought it’d make a great scalloped edge for a craft project! Finally- one day it hit me, I could make a diy popsicle stick scallop tray. Want to see the process?!
how to make a DIY Popsicle Stick Scallop Tray

I started out with this tray. It was old from Walmart. I had used it for seeds so it’s been in a shed collecting dirt and looked horrible. It’s still available to buy online. If you want to do this project, you could buy it OR use something you have at home OR look at the thrift shop to see if you can find one for a few dollars.
I thought I’d also share my inspiration for this project! Last month I shared a bunch of items with scalloped edges and I saw a tray for $218! I loved it, but that price is CRAZY for a tray! Maybe I could make my own, I wondered.
SUPPLIES


step 1

Start by cutting the sticks down. For this tray, 2 3/4″ made for the perfect scalloped look with just the circle part poking up from the top. To cut them, I used my Ryobi miter saw.

For the tray I used, pretty much every stick in the pack is needed. So we cut both sides of the sticks. For the second size, we used a piece of wood and the clamp on the saw to create a stop. Then we were able to safely cut the rest of the sticks. It was pretty satisfying to cut them all at once since they’re so small!
step 2

Next, take all of the sticks and start gluing them onto the tray. I’ll confess- this is where I messed up with this project. I used construction adhesive for glue and that was NOT the right choice. It took forever to bond with the tray and during that time, the glue caused the sticks to warp. Then, they kept falling off. It was frustrating and I had to re-glue many of the pieces.
If I was to do it again, I’d try contact cement. I think that’d work much better!

step 3


And now, it’s time to cut pieces for around the handle. To do this, I held up a popsicle stick to the tray and the traced the shape opening on the stick. Then, I used an exact-o knife to cut out the shape. You could cut all the sticks this way, but it would take much longer!

step 4


For the corners, I started the sticks in two of the corners. That meant that the other two corners had small spaces that a full stick would be too big for. For those, I simply held up a stick, traced the space on the stick, cut it down, and glued it on.
step 5

Finally (can you tell this project took much longer than I thought it would?!), I used wood filler to fill the spaces between each stick. This will give a much more polished and finished look! I let the first round of wood filler dry and then went back and added more where I missed some. Then, I sanded it to a smooth finish.


Then, I simply painted the whole tray pink. After a few coats of paint, it became obvious that the tray needed caulking around the edges and the inside of the tray. So I added caulk, let that dry, and gave the whole thing one more coat of paint.
You can see where a few sticks warped. Just use the proper glue and you should get a smooth surface.
after


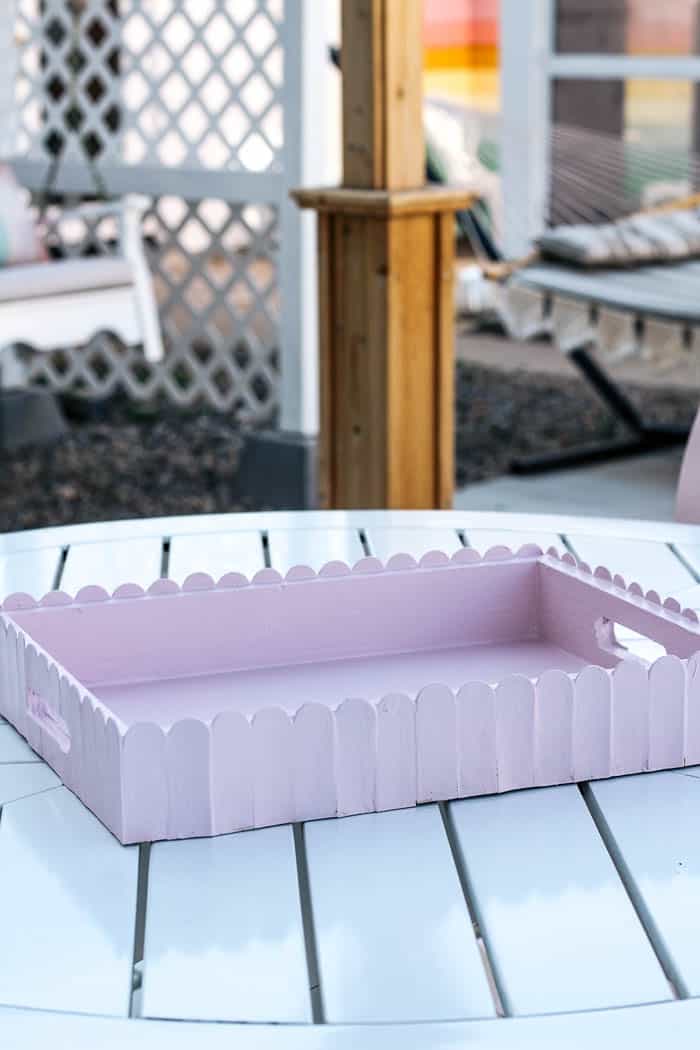
Ta da! Here’s my cute little pink tray! It was fun to take a tray that was basically garbage and make it something I love!


Honestly, the tray isn’t perfect. I tried SO hard to make it amazing, but there’s a few issue with warped wood. Still, I love it and don’t really notice it when using it.

When I was painting it, I thought that that the sticks looked like lady finger cookies. A tray that resembles a dessert- yes, please!

Once the tray was done, we decided to do a campfire! I loaded the tray with toppings for making camp fire desserts. It was prefect for transporting a bunch of stuff outside.


Then we got cooking and got to use the tray right away. PS do you spy the thrifted wicker duck I grabbed above for $1?! I’m obsessed. We tried cooking with these Wolf ’em sticks. Basically, you put biscuit dough over the top and make little cups you fill with toppings. It was so fun!
Anyway, what do you think of the tray? Even though I had difficulties, would you try this?
 This post contains some affiliate links for your convenience. Click here to read my full disclosure policy.
If you love it, pin it!

dear precious Ashley 🙂 & precious family 🙂 this is an adorable post! & the lil pink popsicle stick tray is really so cute! It’s amazing how you made something precious from nothing ~ like the magic of creating a song from the heart on a blank piece of paper 🙂 You took an idea from your heart 🙂 & made something magical ~ In fact your whole back yard looks magical ~ a lil beautiful wonderland of joy! & your pictures are just adorable 🙂 I did spot that lil wicker duck & it’s the cutest thing ever 🙂 I love it too! Thank you for bringing such joy in this world Ashley 🙂 it makes for very happy hearts ~ with love from all of us! xo 🙂