 For months, I’ve been planning a deck renovation. Then, a few weeks ago the furniture started to arrive and it’s been so exciting! We finally have a place to sit outside! One of the items I ordered was an umbrella- totally forgetting to get a stand. But then when I priced them out, they were pretty expensive. So I decided to make my own. Here’s a my DIY umbrella stand.

before of my patio once the furniture arrived
Side note, I know that it may seem insensitive to be working on a project like this right now. There are so much bigger things going on with the world. But my truth is that this project had been planned long before I had a clue that we’d stuck at home.
I am so grateful for the distraction and to have one more “room” to hang out in. I’m doing my best to make the most of this time because keeping busy with projects like this has helped me feel a little more in control.
The thing is, I feel now, more than ever it’s a great time to make your house a home. Make it somewhere you want to be because you’re probably there all the time. Might as well have it be a beautiful place! I’m going to be focusing on affordable DIY’s and ideas for decorating on a budget (like this post with 15 ideas for how to decorate a patio for cheap).
But even if that’s too much to take on, organizing and cleaning will make a difference. Our surroundings are one thing that we can control and if they are in order, we’ll feel better. I believe that and hope I can pass on some ideas for creating spaces you love no matter your budget.
DIY umbrella stand SUPPLIES
- 3- 2x6x12 Pressure Treated Lumber
- 1- Box of Screws
- 4- Casters
- 1- Steel Pipe
- 2- Bags of Concrete
- Wood Filler
- Ultra Pure White Exterior Paint

step 1

Start by cutting the pre treated lumber.
Cut list-
- 8- 22 x 2 x 6″
- 5- 14 x 2 x 6″
- 2- 20-1/2 x 2 x6″
- 1- 22 x 2 x 2-3/4″
- 1- 20-1/2 x 2 x 2-3/4″
- 9- 14 x 2 x 2 3/8″
- 2- 6 x 2 x 2 3/8″
Note the 2 3/8 width is made by ripping the 2×6 boards in half with a table saw.


Attach 3 of the 14 x 2 x 6″ to 2 of the 14 x 2 x 2 3/8″ with three screws on each side. This will create the base of the umbrella stand.

Then, attach 3 of the 22″ 2×6″ boards with 2 screws each on the ends of the 14″ base.
step 2

Next, attach 2 of the 20 1/2″ x 2 x 6″, and 1 of the 20 1/2″ x 2 3/8″ boards on top of the base and in between the sides to create the third wall. Note, these are the pieces directly on the table in the picture.

Next, attach 2 of the 22″ x 2 x 6″, and 1 of the 22″ x 2 3/8″ boards on to the side of the base and in between the sides to create the forth wall.

On the bottom of the umbrella stand, attach the 4 casters on.
step 3

And now, mark the center of the inside of the umbrella stand base.

Pre-drill the 14″x 2 3/8″ pieces of lumber at an angle.

Use screws to attach these pieces of lumber to the sides so that the galvanized pipe is held in place on center while the concrete is being poured. Also attach the 6 x 2 x 2 3/8″ pieces underneath.

Next, mix and pour the concrete into the base of the umbrella stand. We used two bags and you can see how high up it came after the second bag.

step 4
Now it’s time to put the top on! First, screw two 14 x 2 x 2 3/4″ to the sides to keep the top pieces of wood from falling in. Once that support is in place, put 2- 14x2x6″ pieces on the sides and 1- 14x2x 2 3/8″ in the middle. Use screws to attach them to the ends.

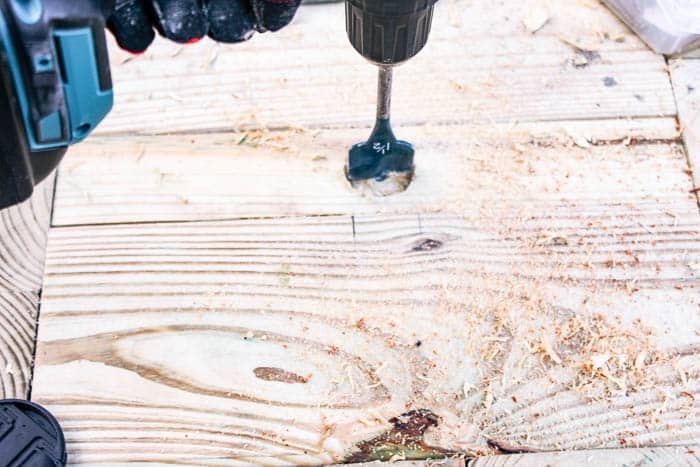
Then, drill a 1 1/2″ hole for the umbrella to go through.
step 5

To finish up the umbrella stand, sand off any rough edges.
 Then, fill the screw holes with wood filler. I did two coats of wood filler and let dry over the weekend.

Sand down all of the screw holes that had been filled. Then paint!
I applied two coats of white exterior paint to finish the umbrella stand.
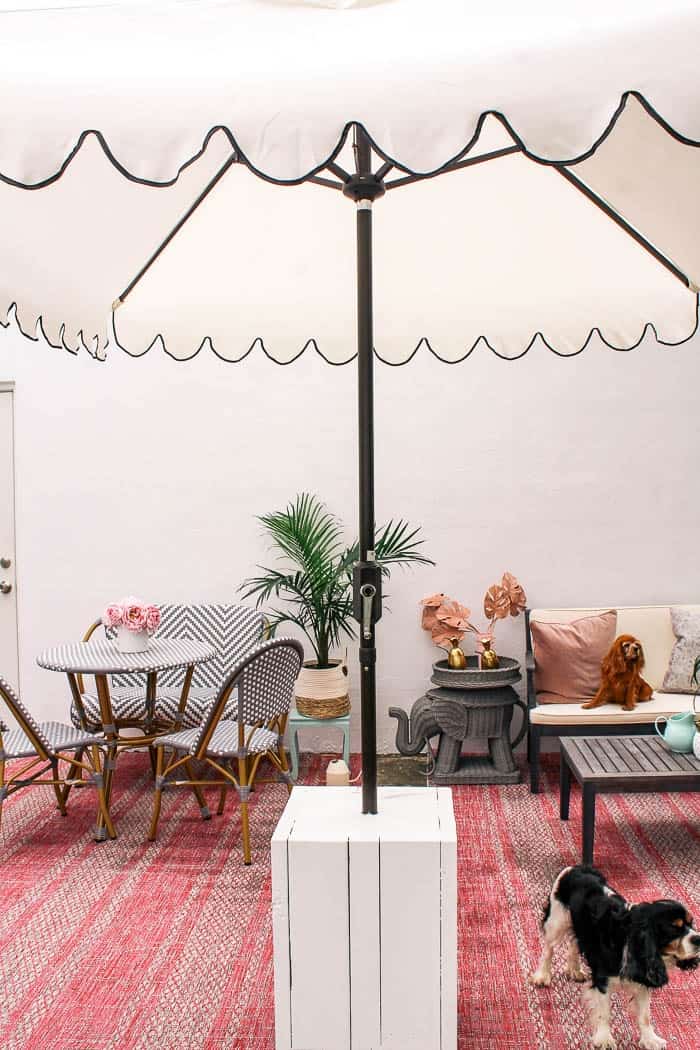
after

settee / chair / table / elephant end table / umbrella / pink rug / sofa set /
Here’s the finished umbrella stand. It works as an end table and is super heavy duty. I pulled out all of the patio furniture to show off the new stand and the wall I just finished painting!

For this area, I planned two matching rugs to distinguish each space (dining on the left, sitting on the right). They can also be placed right next to each other to look like one big rug.  It’s super nice having a functional umbrella! It’s already pretty hot here in Florida- up to 90 in the day. So having the umbrella adds some nice shade. Let me know if you have any questions on this DIY- I’m happy to answer! Until then, you know where I’ll be ;).
 This post contains some affiliate links for your convenience. Click here to read my full disclosure policy.
If you love it, pin it!

This is genius! I’ve actually been debating that umbrella or the black one from Target. Do you like it?
Thanks Jewel! So far, we like it a lot! Target’s my go-to for umbrellas
what a great idea, well done. Too many times you may find an umbrella without a stand now one can build their own thanks for sharing
come see us at http://shopannies.blogspot.com
Thanks Angie 😘
Definitely a good and sturdy stand ~ pinned. I love your patio makeover!
Thanks so much Allyson! 😘
Your umbrella stand looks better made than the mass produced stands. Your deck looks great – a wonderful place to hang out. And I agree that we might as well be busy. It helps no one to sit around in despair.
Michelle
https://mybijoulifeonline.com
What a fantastic idea! Thank you for sharing!
Happy you liked it! Thanks for reading Maya 😘
Your outdoor living space looks so inviting. Love that rug! This is a great idea and love that you have it on casters to move it around easily. Pinned
Thanks Marie! Yes, movability was super important for us💕