I love the idea of a Little Free Library! They give access to books to kids and adults all day, every day. It’s a great way to get to know your neighbors and embrace your love of reading. I thought I’d share my Little Free Library Plans so you can build one too! This tutorial has been used by hundreds of people and I hope it’s helpful to you too.
At my last house, I had the cutest Little Free Library that I LOVED. It was built from an up-cycled cabinet. This project will build the library from scratch.

If you haven’t heard of little free libraries- they are book share boxes made by normal people and put outside their homes or shops that are filled with books that anyone can borrow or add to. Plus, they’re a great way to creatively make something that will benefit your neighbors while building community connections. Plus they look cute outside your house!
The first little library was built in 2009 and since then over 75,000 public book exchanges have popped up and are registered here. For $39 you can get a plaque with a registration number if your build your own library.
Here’s the rules for a Little Free Library if you’ve never used one. They are free so anyone can take a book or share a book. If you see something you like, feel free to take a book- you don’t need to leave a book to take one. If you’re ever done with a book, consider donating used books to a little library in your area to share the love of reading.
inspiration
One cool thing about free little libraries is that there is a map here to show ones in your neighborhood! Which makes it really easy to find all the local mini book exchanges. One day last week, my family and I drove around visiting all that are local to us. I snapped a photo of each one so I could reference them for inspiration later. This was a fun way to get excited about the project and see some cute details that are unique to each one. I’d definitely recommend this activity if you want to make a free little library too.
little free library plans
Let’s start with the video tutorial so you get an overview on what I did. Then, I’ll dive in with more details below
If the video doesn’t work here, you can watch it on YouTube here. I’d be over the moon happy if you subscribed to my YouTube channel! Videos are actually released on YouTube first (usually the night before they’re published on the blog). Thank you!
SUPPLIES
- 3/4″ x4’x8′ Plywood – 1 sheet
- outdoor exterior latex paint (I used Cupcake Pink and ultra pure white)
- shingles (we had some on hand- these are similar)
- roofing nails
- brass hardware pull
- decorative onlay
- hinges– 1 pack
- poly acrylic clear top coat
- cabinet door magnet
- wood filler
- caulk
- construction adhesive
- concrete– 2 bags
- wood for door- 1″x3″x8′– 1
- cap trim for door -1
- plexi glass 11×14
- 2x4x8 studs– 1
- 4x4x6 cedar posts– 1
- screws
- brass plaque (if you choose not to register your little library)

Note, we tried to use items we had at our house that were leftovers from other projects. Both to be economical and good to the planet. I’d suggest trying to use items you already have too!
step 1- cut the components of the Little free library

Start by cutting the plywood sheet into smaller pieces. This project is more affordable because we took a large piece of wood and cut it down with a table saw. This will provide the front, back, sides, two roof pieces, shelf and base of the little library. Cut the wood to the sizes indicated below. Make sure to cut 2 of the front and back and sides.

What are the dimensions of a free little library? This one is 18″ wide x 16 1/2″ deep x 26 7/8″ high. Once on the post the overall height is 46 7/8″ high.
This is a petite size, but plenty big enough to share a variety of books with the neighborhood. Plus it’s designed to be economical and easy for a beginner to build. Since creating this tutorial, hundreds of people have make Free Little Libraries using this tutorial! If you do too, please take me (@athomewithashley) on Instagram- I LOVE seeing your creations!

To cut the front and back of the house, use a circular saw to cut the peak. The roof is cut on a 45 decree angle. The angled cut starts at 18″ high.
step 2- build a base
Next, make the base for the little library. For this, we used the piece of plywood we cut and screwed in 2×4’s for the bottom. We cut the 2×4′ into 3 lengths (cut 2 of each)- 16 1/2″, 7 7/8″, and 3 1/2″ x 2 3/16″. These create a square opening in the bottom where they will sit on the post.

Here’s the top of the plywood where we screwed the plywood and 2×4’s together. This will be the floor of the little library.
step 3- assembly

It’s now time to begin putting the little free library together! Screw the sides into the complete base. We used four screws at the base on each side.
To attach the back, we used 4 screws at the base and 3 screws on each side.
For the front of the house, we already had that piece cut, but we needed to cut in an opening where the books and door will go. We started by drawing where the door would go. This helped us figure out where we wanted the opening to be. We decided to have our opening be 11″x14″ since that is the size of plexiglass we’re using.

Once that was settled, we drilled a large hole through the opening to give our jig space to begin cutting. We used the jigsaw to cut out the opening

Last, we used screws to attach it to the rest of the house.
step 4- ROOF SUPPORT AND SHELVES

And now its time to work on the roof! Cut 2×4 inch studs for this step. We started by attaching pieces to the roof so we had a place to attach the trusses.

For the shelf, we screwed the two pieces together that we cut above.

Next, we screwed it into the little library. I thought a shelf would be nice so that we could put more books into the inside and still have some space for tall books.
step 5 – the door

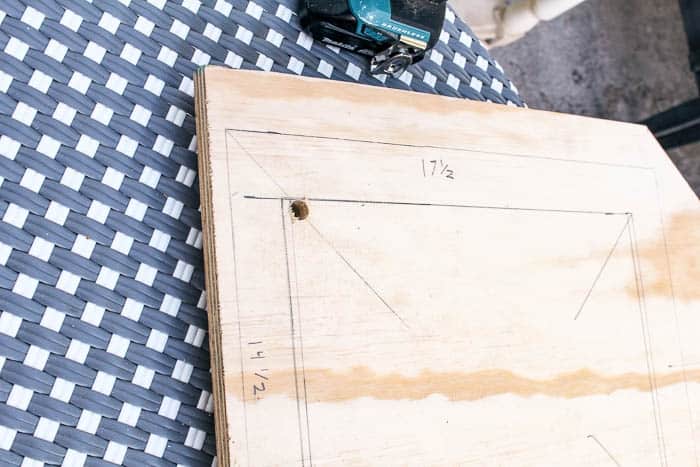
To create the door, we began by cutting our 1″x3″ board into 4 pieces with a miter saw on a 45 degree angle. We cut two pieces 17 1/2″ long and two pieces 14 1/2″ long. At this time, we also cut the cap trim that will go over the Plexiglass. We cut two pieces 14 1/2″ long and two pieces 11 1/2″ long.

You can see how the 4 pieces of 1″x3″ wood made the base of the cabinet door. We’ll layer Plexiglass and trim on top to finish it off.
To attach the pieces of the door, we used screws to connect them. You can see this better in the video above.
Next, I used wood filler to close up the seams and cover up the screw holes. When that was dry, I sanded it smooth. At that time, I primed the PVC cap trim with Slick Stick so that I could paint it without the paint coming off (something I recommend doing whenever painting plastic).

Next, everything got painted Cupcake pink.

After the paint dried, I put a small bead of construction adhesive around the perimeter of the door. Note, before glueing, I traced the piece of plexiglass so I knew how far to glue AND where to place the glass once I’d put the glue down.

I placed the plexiglass on top of the glue and firmly pressed down.

Then, I glued on the pieces of PVC cap trim to finish it off. Make sure to have a wet paper towel close by in case any glue seeps out. I let this dry overnight without touching it. Once dry, I used caulk to fill all the seams and did some paint touch ups.
step 6 finish work
For the finish work, start by caulking every seam. You want to think about the fact that this will be sitting outside so you don’t want bugs or water to get in. I used caulk on the plywood edges to smooth it out a bit to prep it for painting. For the screw holes, I used two coats of wood filler to completely fill the holes.

Once that was dry, I sanded every surface so it was as smooth as possible.

Finish by painting any unpainted areas with outdoor paint. I used Cupcake pink and did 3 coats.

Once that was dry, I painted the bottom while it was inside. I figured painting it on its side like this was WAY easier than painting it once it was in place outside. I finished up sealing the little free library with Gator Hide (a poly acrylic clear top coat). Make sure to lightly brush it on so it doesn’t yellow the surface.

Screw on two hinges onto the door.

finish the roof
Attach the two pieces of plywood to the top to create a roof.

Attach the pulls to the door of the library. Next, attach the hinges to the front of the library.
On the inside, you can kind of see the magnet we added to the door. This is a VERY important step! This makes it so that the door stays close during wind. We didn’t do this with our last little library and in a storm, the doors blew open and one broke off and the glass shattered. After that, we repaired it and added a magnet. Don’t skip this step!

For the roof, use roofing nails to attach shingles to the top.
If you’re wondering- how do I waterproof my little free library? Do two things- use shingles designed for a home and attach them to the top. If the roof angles down and there is an overhang on the roof, that will protect the majority of the library.
Second, use exterior paint on the library and post. Exterior latex paint is durable, easy to get at the hardware store and will weatherproof the house.
step 7- post
How do you put a little free library in the ground? Did an 18″ hole. Put the post in the hole. Pour concrete in the hole- add water. Brace the post while the concrete dries. Once dry, cut the post to the correct height (18-20″ above the ground) and screw the little free library onto the top of the post.

Outside, we dug an 18″ deep hole for the post to go into. This will be the support for the little free library.

We put stakes in the ground and screwed on scrap pieces of wood to hold the post level. Then we put in our bags of concrete and mixed them with water.

While those were setting, we used a saw to cut the post down to the height we wanted. Lastly, we painted the post white.
How high off the ground should a little library be? The lowest shelf should be 18-20″ off the ground. That way a child or someone in a wheelchair can reach the books on the bottom shelf. I want my little free library to be accessible to anyone who wants to read so having it at the proper height is an important consideration.
Once the post is secure in the ground, put the little library house on top of the post. Use screws and from the inside of the library attach it to the post. Use wood filler to cover up the screw heads and paint over them so they disappear. The bottom of the little library is designed to sit perfectly on top of the post and give it more support. I show this step better in the video.
after- little free library plans

Here are some pictures of it all assembled in front of our house! Doesn’t it look sweet?!

I filled it with all of the books I had on hand. They’re mostly chapter books Don (my son) and I have read together, but you’ve got to start somewhere! Once thrift stores are open I’ll stock it even better.
Edited to add- this project was built during 2020 and so buying books in person at a thrift store wasn’t possible. I shared what I had and soon my neighbors did too. It was a great way to say hello during a lonely time.

I just love the character it adds to the front of the house! I have a brass plaque coming today that says “little free library, share a book, take a book.” Until it arrives, I really need to add a hand written sign to the front!

Last night I was chatting with my neighbors and they were really excited for it! They had some ideas for how to get the word out about it (like sharing about it on our town’s Facebook group) and said they’ll add books too. That made me happy.
This has been such a fun project! I love reading and that this project celebrates that. Plus this little library reflects my style so putting it together was a joy. Honestly, this project was a little tricky to carry out with slow ship times and trying to shop in store as little as possible. It was worth it to push past the barriers, but it did feel like it took extra long because it was harder to do.
Really, the saying “anything worth having is worth working hard for” is true and applies now more than ever. I’ll keep fighting to create. Hopefully soon this will all be done and all aspects of life will be easier!
I hope you enjoyed my little free library plans. Please let me know if you have any questions in the comments.
UPDATE—

After finishing up my Free Little Library, I felt like it was missing something. So I ordered scalloped dollhouse trim, painted it white, and glued it on to the roof line. How cute is that little addition?! It’s all in the details!
Plus you can see the brass sign that arrived too!

If you’d like to make this project at home, here are some printable plans to make it easier.
Little Free Library Plans

Materials
- 3/4″ x4’x8′ Plywood – 1 sheet
- outdoor exterior latex paint
- shingles
- roofing nails
- brass cabinet knob
- decorative onlay
- hinges– 1 pack
- poly acrylic clear top coat
- cabinet door magnet
- wood filler
- caulk
- construction adhesive
- concrete- 2 bags
- wood for door- 1″x3″x8′- 1
- cap trim for door -1
- plexi glass 11×14
- 2x4x8 studs– 1
- 4x4x6 cedar posts– 1
- screws
- brass plaque
Instructions
1. Start by cutting the plywood sheet into smaller pieces. This project is more affordable because we took a large piece of wood and cut it down with a table saw. This will provide the front, back, sides, two roof pieces, shelf and base of the little library. Cut the wood to the sizes indicated below. Make sure to cut 2 of the front and back and sides.

2. To cut the front and back of the house, use a circular saw to cut the peak. The roof is cut on a 45 decree angle. The angled cut starts at 18″ high.
3. Next, make the base for the little library. For this, we used the piece of plywood we cut and screwed in 2×4’s for the bottom. We cut the 2×4′ into 3 lengths (cut 2 of each)- 16 1/2″, 7 7/8″, and 3 1/2″ x 2 3/16″. These create a square opening in the bottom where they will sit on the post.

4. It’s now time to begin putting the little free library together! Screw the sides into the complete base. We used four screws at the base and 3 screws on each side.
5. For the front of the house, cut an opening where the books and door will go. Start by drawing where the door would go. The opening will be 11″x14″ since that is the size of plexiglass we’re using.

6. Drill a large hole through the opening to give the jig space to begin cutting. Use the jigsaw to cut out the opening.
7. And now its time to work on the roof! Cut 2×4 inch studs for this step. We started by attaching pieces to the roof so we had a place to attach the trusses.
8. For the shelf, screw the two pieces together that were cut from plywood earlier.
9. Next, we screw it into the little library. A shelf would is nice so you can maximize the number of books the little library holds.
10. To create the door, begin by cutting the 1″x3″ board into 4 pieces with a miter saw on a 45 degree angle. We cut two pieces 17- 1/2″ long and two pieces 14- 1/2″ long. At this time, we also cut the cap trim that will go over the Plexiglass. We cut two pieces 14- 1/2″ long and two pieces 11- 1/2″ long.
11. To attach the pieces of the door, use screws to connect them in each corner.
12. Next, use wood filler to close up the seams and cover up the screw holes. When that is dry, sand it smooth. Prime the PVC cap trim with Slick Stick so that I could paint it without the paint coming off (this is important to do when painting plastic). Paint the door the color of your choice (I'm going pink).
13. Track the plexiglass on the door so you know how far to glue and where to place the glass once the glue is down. Put a small bead of construction adhesive around the perimeter of the door. Place the plexiglass on top of the glue and firmly pressed down.
14. Glue on the pieces of PVC cap trim to finish off the door. Make sure to have a wet paper towel close by in case any glue seeps out. Let this dry overnight without touching it. Once dry, I caulk to fill all the seams and paint over the caulk.
15. For the finish work, start by caulking every seam. You want to think about the fact that this will be sitting outside so you don’t want bugs or water to get in. Use caulk on the plywood edges to smooth it out a bit to prep it for painting. For the screw holes, use two coats of wood filler to completely fill the holes. Once that was dry, I sanded every surface so it was as smooth as possible.

16. Paint the body of the little library with outdoor paint. I used a pink and did 3 coats.
17. Once that was dry, I paint the bottom while it is inside. Finish up by sealing the little free library with Gator Hide (a poly acrylic clear top coat). Make sure to lightly brush it on so it doesn’t yellow the surface. Both of these steps are designed to give the library a longer life outside. Painting the bottom protects the wood from termites.
18. Screw on two hinges onto the door.
19. Attach the two pieces of plywood to the top to create a roof. Nail the shingles onto the roof. Attach the pulls to the door of the library. Next, attach the hinges to the front of the library.
20. On the inside, you can kind of see the magnet we added to the door. This is a VERY important step! This makes it so that the door stays close during wind. We didn’t do this with our last little library and in a storm, the doors blew open and one broke off and the glass shattered. After that, we repaired it and added a magnet. Don’t skip this step!
21. Did an 18″ hole. Put the post in the hole. Pour concrete in the hole- add water. Brace the post while the concrete dries.
22. Once dry, cut the post to the correct height (18-20″ above the ground) and screw the little free library onto the top of the post from the inside of the house. Add books and enjoy!
Notes
If you make this project, please tag me @athomewithashley on Instagram so I can see your creation!
 This post contains some affiliate links for your convenience. Click here to read my full disclosure policy.
If you love it, pin “Little Free Library Plans”!


I think this is such a great idea, especially during this time in our world. I’ve seen many of these little libraries but I have to say, yours is one of the cutest! Love how you painted it to match your front door – which gives it a warm welcoming message! Pinned
You’re so sweet, thanks as always for reading along and pinning Marie!😍
I love how you painted it pink! Most of the ones I have seen have all been yellow. Unfortunately all the little libraries in our town have been closed up for now.
Hi Cynthia, Thank you! I’ve heard of other little libraries being closed. None are closed in my area. I’ve been suggesting to people that if they’re worried about borrowing a book to wear a glove or plastic bag when grabbing it and then letting it sit in the garage (or any space where it won’t be touched) for a week. Then any germs that may have been on it will die. Honestly, since the books are outside in the sun, I’m not too worried about it, but I think there’s ways to still borrow books while staying safe if it makes people nervous.
This is such a great idea, I really love it. Pinned
Thank you Anita 💖
This is so charming!! What a lovely thing to do for neighbors. Abso love your color choices too – what a cheerful place to live. Best, Jen
Thanks so much Jen!
So cute! I learned of Little Free Libraries about six or seven years ago. Such a wonderful idea!
Aren’t they so fun? We really enjoy getting books out of ours and seeing what people have left😍