 One of my favorite things to do is stop by the thrift store and grab an affordable piece of furniture and redo it. I was looking for a piece to hold linens in Don’s closet. We don’t have a linen closet, so when I found a $12 cabinet that opens up to reveal a hamper, I was super excited! It was perfect.
Except for all the scratches and dents. Nothing that paint couldn’t fix!
I also decided to experiment with a new type of paint- it’s called Patina. For me, it’s fun to try new things. Patina is a three step process- you use paint with metal in it and then spray it so the paint oxidizes. Lastly, you stop the process and protect the finish. It makes a It makes a unique metal finish that looks worn. Here, I’ll show you-
patina paint tutorial
Let’s start with the video tutorial so you get an overview on what I did. Then, I’ll dive in with more details below:
If the video doesn’t work here, you can watch it on YouTube here. P.s. I’m trying to build that page up, so if you’d subscribe, I’d really appreciate that!SUPPLIES

- White Lighting Cleaner
- Slick Stick
- Mint Julep Chalk Paint
- Paint Brush
- Patina Paint- Bronze
- Step 2 Patina Spray- Green
- Step 3 Patina Guard
- Clear Matte Spray Wax

step 1

Start by removing the hardware. Next, give it a good scrub down. This piece was especially dirty- fun ;).
Since this is a laminated piece of furniture, the finish is really smooth. Because of that, the chalk paint will scratch off. To prevent that, it needs to be primed. So I used Slick Stick as a primer. I’ve used it a lot before and I’m a HUGE fan of the great job it does!
step 2

Next, start with a really thin coat of chalk paint. With chalk paint, you really need two coats. So go super thin on the first one. The thinner the better! Just know you’ll cover up those streaks the next go around!

 Continue with a second coat making sure all the surfaces are covered. For the front of the cupboard, I didn’t do a second coat since that’s where I’m putting on the Patina treatment.
step 3

And now it’s Patina time! I was a little nervous for this part because Patina is a chemical reaction so you just don’t know how it’ll turn out. Start by putting on a coat of the Patina paint. When that’s dry, do a second coat of the Patina paint. While it’s still wet, spray on the Patina spray and watch it do it’s magic! Note, I wanted an ombre look so I applied the Patina lighter up top.
 As the patina worked, I blended the top and added on more coats of the patina paint and spray where I wanted it. In some spots, I added a bit of Mint Julep paint to keep it more pastel. Up close, it’s really pretty. Kind of like a water color. It reminds me a bit of a Monet painting.
When the process was complete and I was happy(ish) with it, I used Patina Guard to stop the oxidation. Next, I put the cabinet hamper back together. When everything was dry, I finished up by spraying on wax and buffing it in with a rag.

after

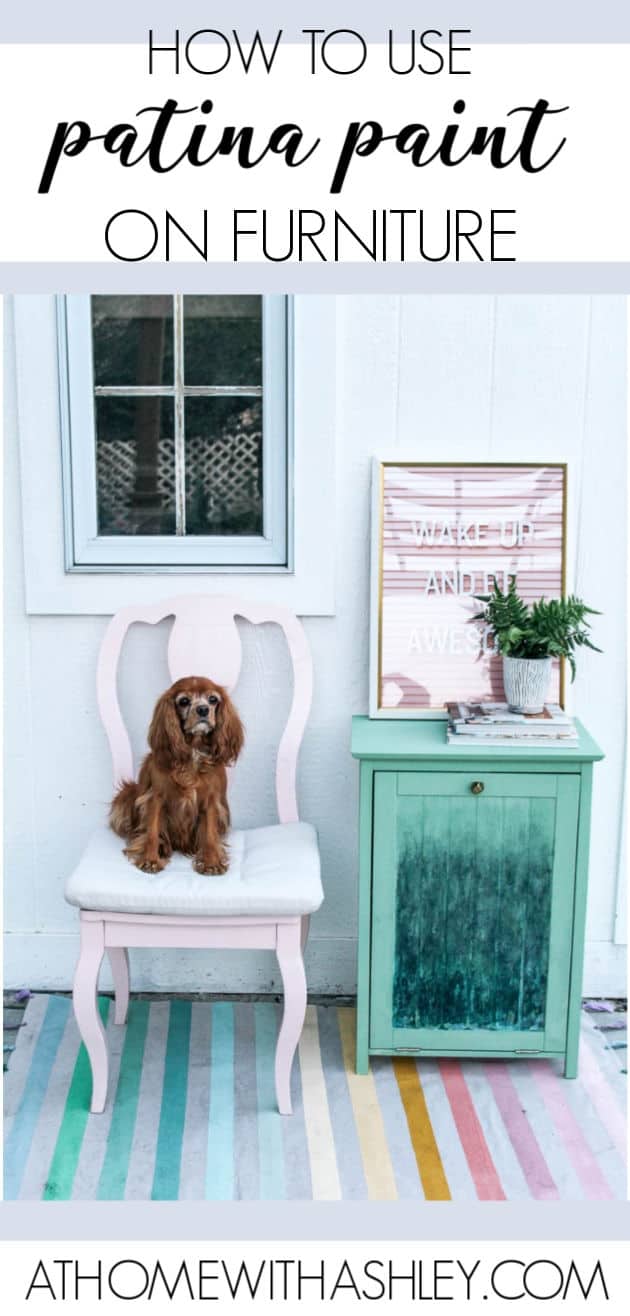
Here’s how the cabinet looks all finished. If I’m being honest, it’s a little darker than I’d like (you know that I love my pastels). I think it’s ok for not every project to be a slam dunk. I don’t love it, but it is ending up in a closet. It was fun to try something new though!

I always say, it’s just paint. I can always sand this off and try again if I really hate it. What do you think? Am I being too picky?

p.s. wondering about this cute rug? You can see the DIY tutorial for how to make a rug from a drop cloth here.
 This post contains some affiliate links for your convenience. Click here to read my full disclosure policy.
If you love it, pin it!