I had the most fun experience this week and I’m so excited to share it with you! I got to redesign a little boys room on a tight budget. With a theme. The install happened in a few hours and then we got to reveal it to the boys that day! I packed some fun ideas in this space so I thought I’d show some before and after pictures and a tutorial from this TMNT boys budget themed room.
All after images in this post are by Elizabeth Ashdown Photogaphy.
before

This is the home of Liz Dean, another blogger. We’re friends so it was fun to redo a space in her house! This room used to be the play room, but it wasn’t used much. Liz wanted her boys in this bigger room, so I helped her switch over the space.  You can see that the room had great bones- wood floors, lots of natural light, and the mountain mural that her husband painted. Here’s the mood board that I created for this bedroom.
 wall inspiration image / bedding / lair / sconce / tmnt toy / bed / art inspiration / gallery wall inspiration
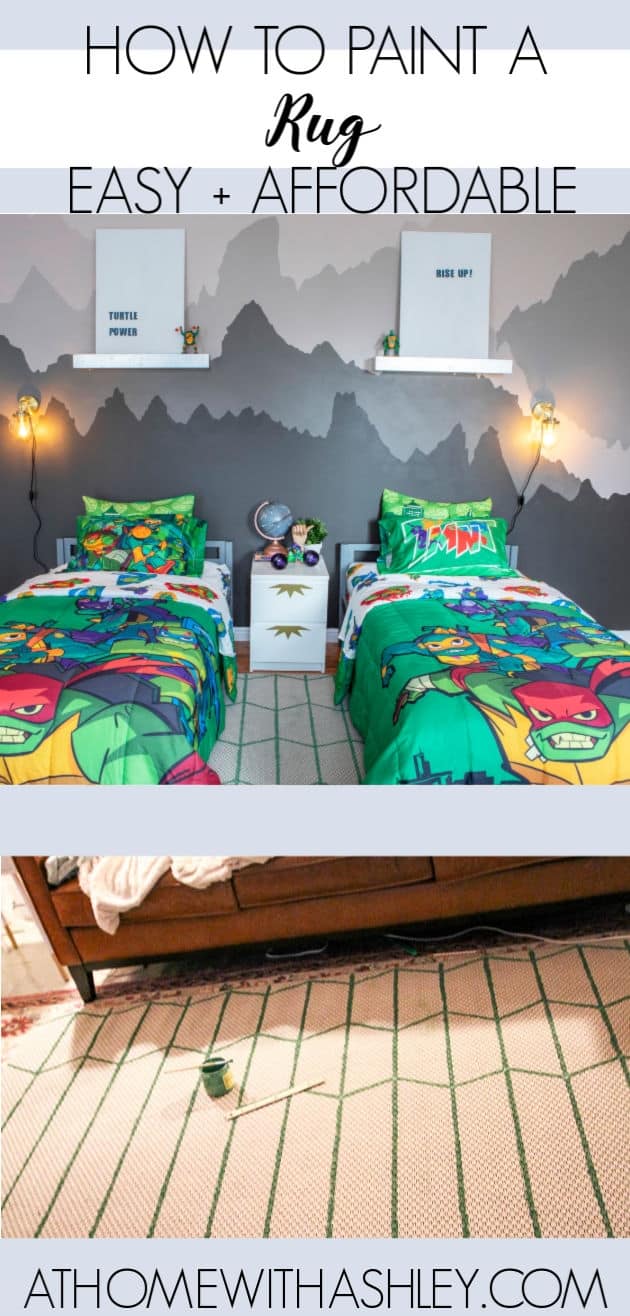
TMNT boys budget themed room- after

For this room, the goal was to do a TMNT (Teenage Mutant Ninja Turtles) themed room with fun bedding and modern decor. I liked the challenge of working with character bedding and then toning that down with the other elements.
I also have a video to share of the reveal if you want to see how it exactly unfolded!
If the video doesn’t work, you can watch it on YouTube here. For a simple touch, over the beds, I hung white canvases with catch phrases from the movie. It’s visually calm, affordable, plays to the theme, but is simple enough to not compete with the bedding. I bought a set of already painted canvases for $20 and then painted them white to save money. The words are made of vinyl that I cut on my Cricut. Here they are in progress-
I think this idea could work for any themed room- just change the words and you’re set!
We hung the shelves really high to prevent the boys from hitting their heads on them or hanging on them. Note, those were already owned by Liz, the homeowner- these shelves are similar. For reading, we installed a few light sconces. My favorite element of the room is probably the IKEA Malm nightstand. It’s a $40 super plain piece, but then I cut out gold metallic vinyl with my Cricut in a star burst to add a graphic element. It’s a simple IKEA hack (it literally took me 2 minutes to do!), but it gives the perfect punch.
I like that it looks like a speech bubble- it’s kind of perfect for a themed room. Plus having a little storage is always a good thing!
 You can see a bit of the rug here. I got a $99 large rug from IKEA (the Morum) and then painted it to look like turtle shells! I’ll share the full tutorial below. This is a super doable budget friendly project! Under two twin beds you want an 8×10 or 9×12 rug. This one is 7×10, but it still works.
I think it’s fun to take an element for the theme and find an abstract way to represent it. For, say a Frozen room, you could do snowflakes on the rug. It’s a relaxed and design friendly way to create a themed room.
lair

On the back wall, I put a little play area for the boys. The big toy is a TMNT lair. I placed two of these bean bag chairs next to the toy for a comfy spot to sit while playing! It’s also nice for adults during play time. The neutral texture adds some beautiful warmth to the space. On the wall, I hung a small gallery wall with Ribba frames and pages cut from this TMNT graphic novel. If you’re tight on money while decorating a theme room, cut apart a book that matches the theme. It’s fun and affordable!
To be honest though, if I’d had more time, I’d add some bigger art to the mix so the gallery wall takes up more space on the wall. 

For the opposite wall, we moved in an antique dresser that Liz had. Isn’t it pretty?! I hung a round mirror I had from home for over the dresser. As a note about accessories in a kids room, you want to use items that can be thrown and not make a big mess or break. Even though it can mean more of a clean up (since kids love moving things everywhere), I love having a well accessorized room!
Here’s some ideas on accessories to use that’ll work in a kid’s room-
- Cute toys (like the rainbow abacus or the TMNT figurines)
- Faux plants (like the fern)
- Plastic globe (like the constellation globe)
- Wooden hand (I scored this one for $3 in the As Is section at IKEA!)
- Books (I stacked TMNT books under the globe)
 Now that I’ve shown the finished room, I thought I’d do a tutorial on how to make the rug!

DIY painted rug
Let’s start with the video tutorial so you get an overview on what I did. Then, I’ll dive in with more details below:
If the video doesn’t work here, you can watch it on YouTube here. P.s. I’m trying to build that page up, so if you’d subscribe, I’d really appreciate that!SUPPLIES

step 1

Start by painting straight lines on the rug every 6″. Use the straight edge as your guide and paint them on with an artist’s brush. At first, I was going to draw on the lines with a pencil, but it didn’t show up on the rug so I painted right on the rug. I needed a lot of paint to do nice thick lines. But it didn’t soak all the way through the rug (which is good because I didn’t put a drop cloth down- I like to live dangerously 😉 ). Side note, the hardest part of this project is keeping your dogs from walking on it! I had one spot where that happened- ugh! Also, I was on a tight deadline with this project so I only had one evening to paint the rug. Sorry for the dark photos and video!
step 2

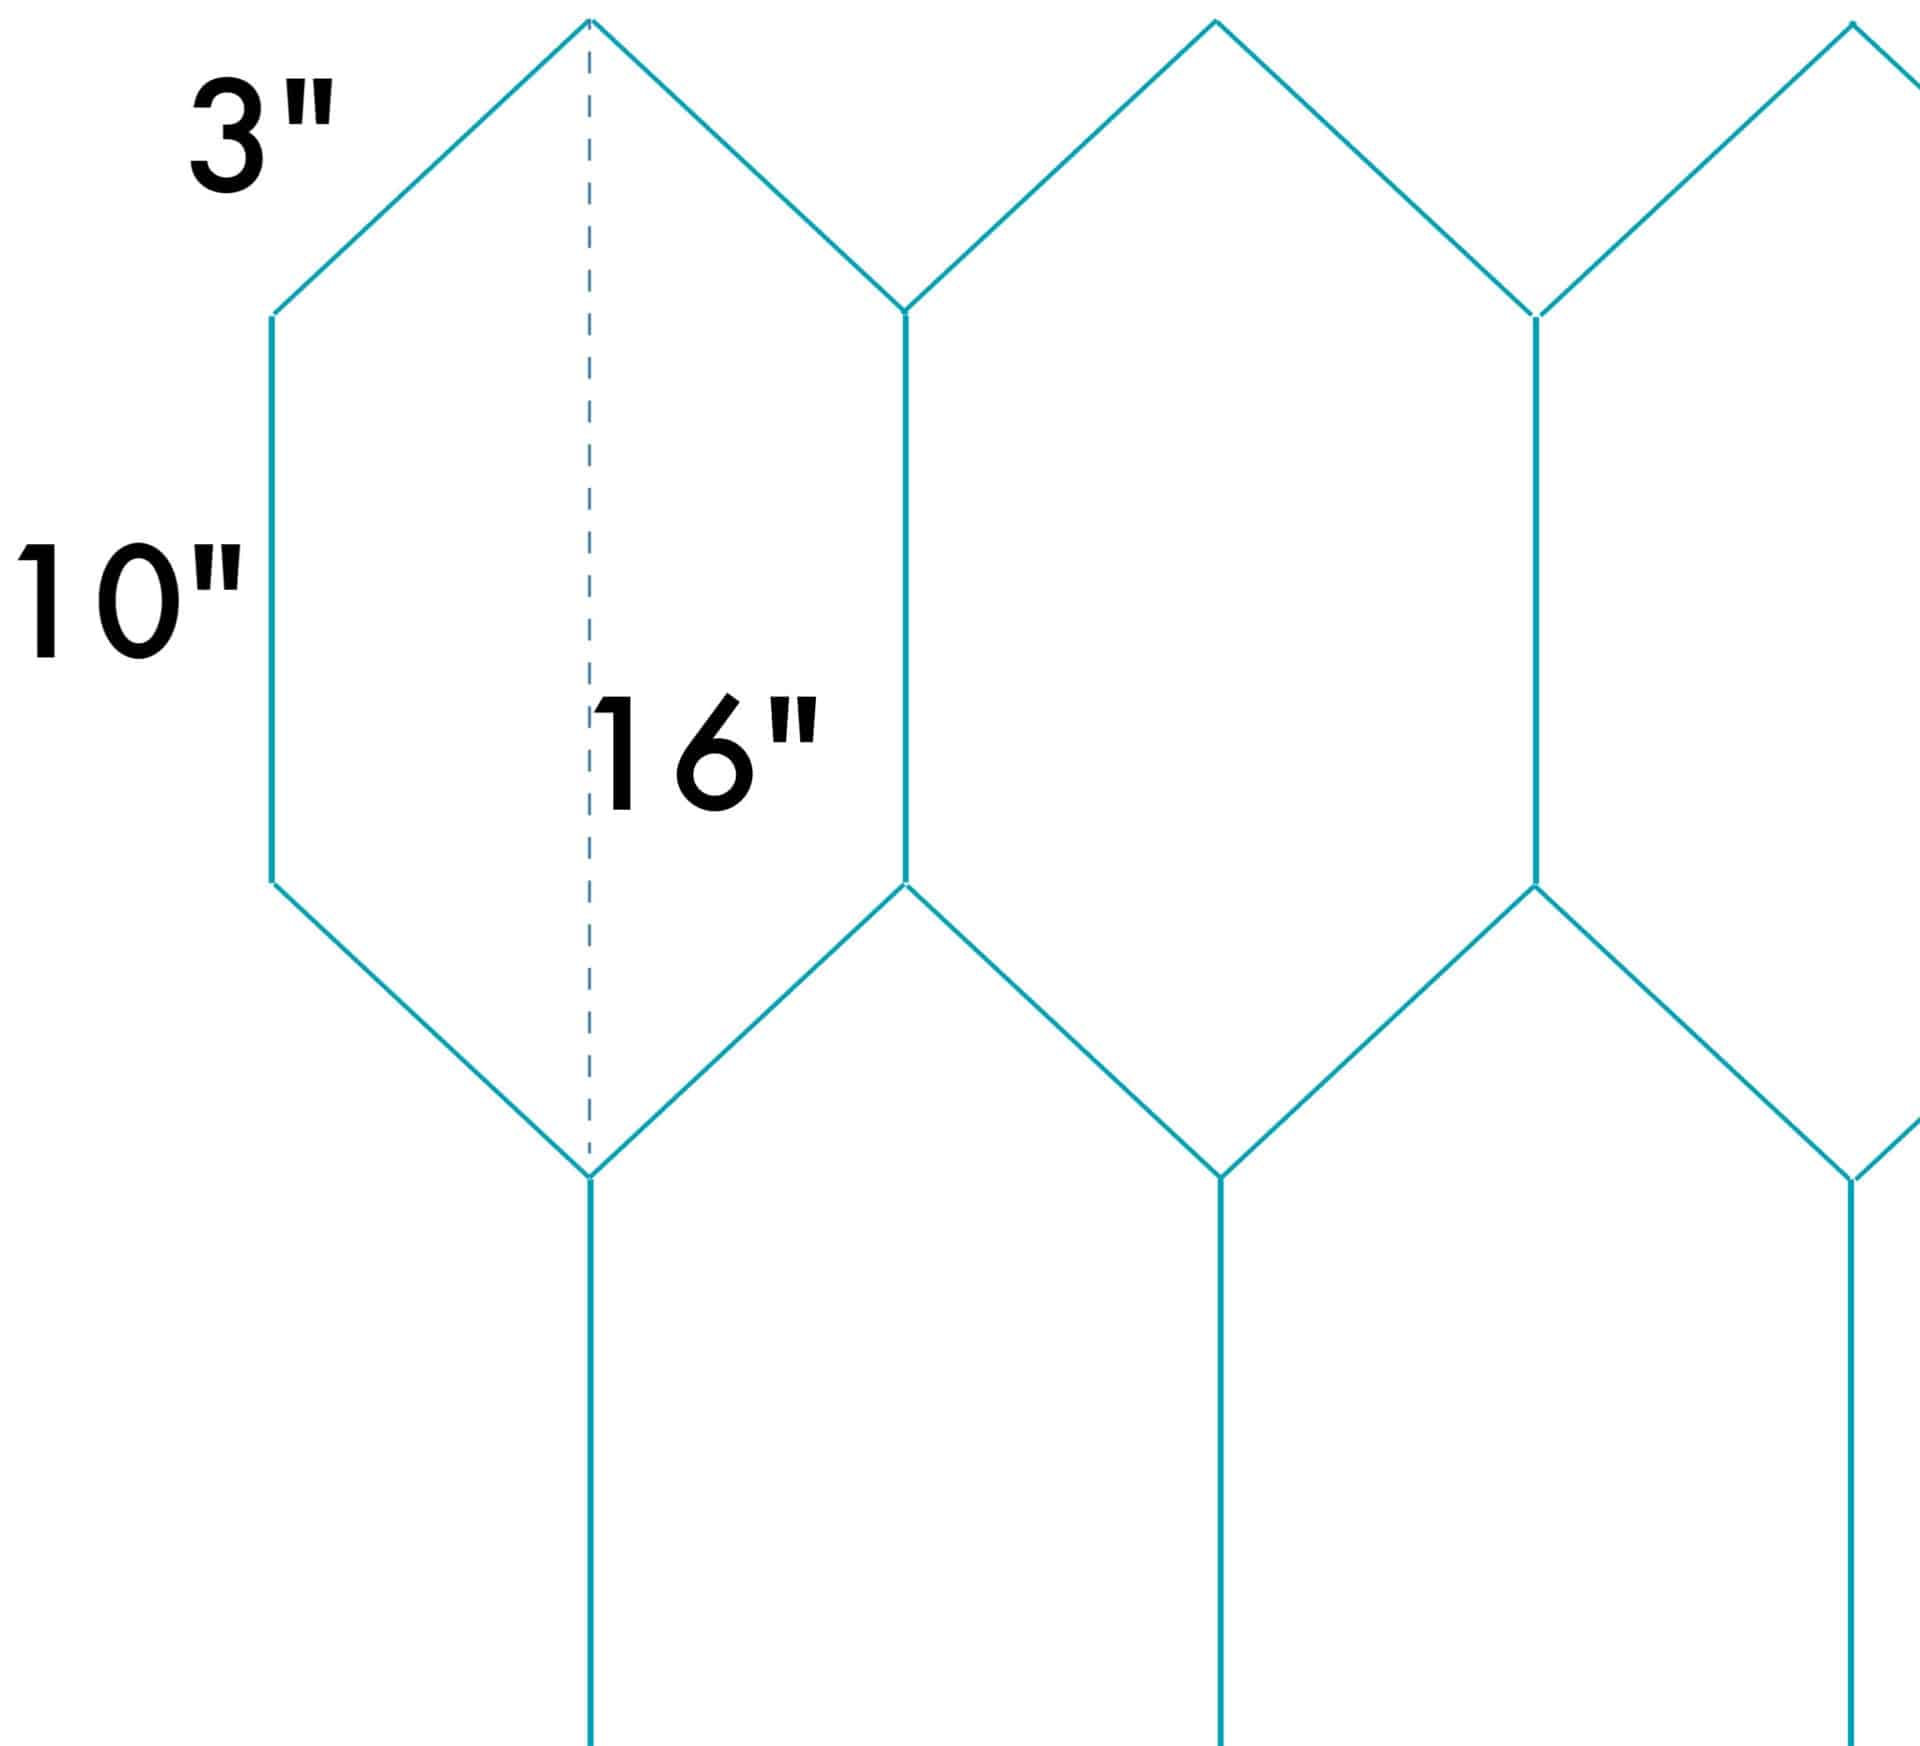
Next, start painting on the diagonal lines. The first row is the hardest, but once you get going it’s super fast! Just draw dots and then you’ll connect them. Here’s the measurements for the “turtle shells” that I drew.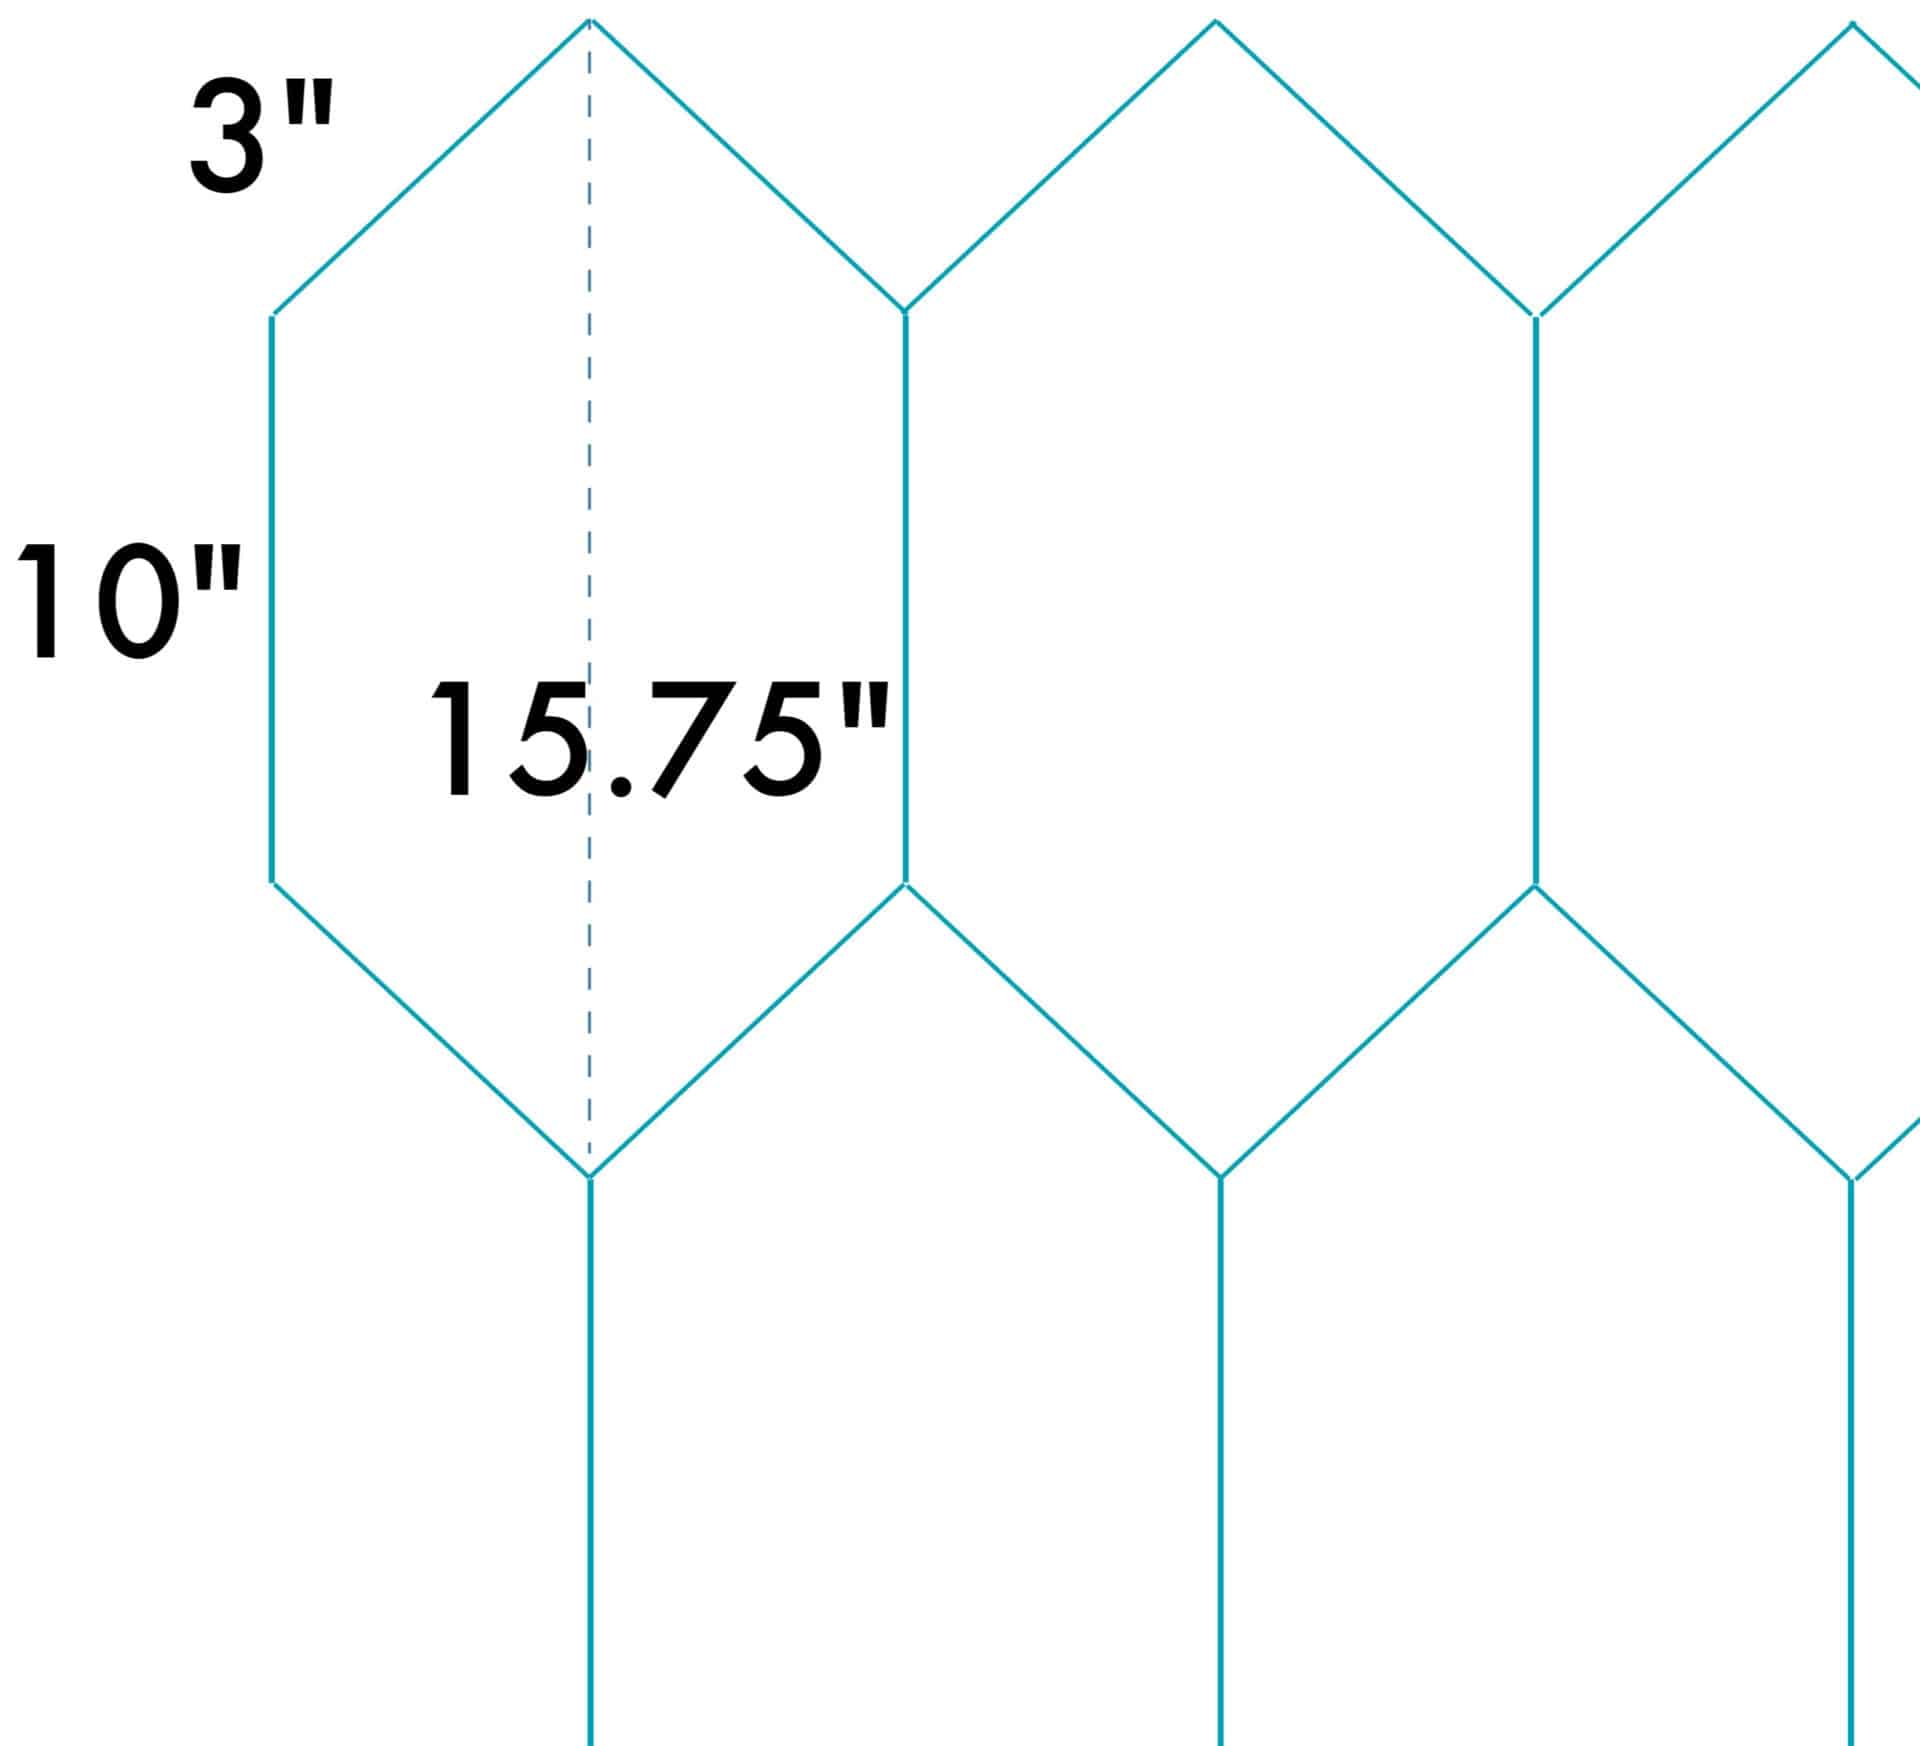 I used a wooden ruler and painted on the diagonal lines. This part was super fun! I just repeated this process until the while rug was covered.

after

After we finished installing everything, we called the boys in to show them their new room. We’d kept the whole thing a surprise and it was SOOOOO fun to see their reactions! They loved it!
I usually have more time to finish a space, but it was a fun challenge to do it in a few hours. I spent around $400 for the decor! So it really was a budget makeover! What do you think about this project? Is this something you’d like to see me do more of? It was really fun! The boys loved this toy most of all. They ran to it and played and played at it. So cute! And they’re excited about sleeping in here too.
Alright- I’d love to hear your favorite part of the room! Just let me know in the comments!
 This post contains some affiliate links for your convenience. Click here to read my full disclosure policy.
If you love it, pin it!