I’ll be the first to admit- process has been slow to start on the patio. But we have officially dove in! We have friends coming to visit in a few weeks so things should be coming together quickly now! The hope is that a lot of the work will be done before their arrival. The first thing that really needed to happen is a fix for the walls- let me show you the issue:
before


 The walls are (poorly) constructed of plywood with HUGE gaps between the sheets. At first, I thought that the gaps were too big to caulk and paint over. But after looking carefully, I decided that I could fill them in and it’d be good enough. The goal with this patio is to make it look as good as possible for as cheap as possible- lol!
I was originally going to paint the walls plain white, but when I shared the above inspiration image last week, I started to think that stripes might be perfect!
After spending too much time on Pinterest, I realized that thick stripes where one color is white are called “cabana stripes”- so cute, right?! They’re named (obviously) from cabanas- huts next to swimming pools. Because of that, they have the feeling of a summer getaway. You’ll see all sorts of items for sale (blankets, rugs, umbrellas) with the name of cabana stripe, but a patio off a pool is probably most fitting for it (in my opinion 😉 ).
how to paint perfect stripes diy

supplies

step one-
I caulked the walls. It didn’t look perfect (especially because I hadn’t painted over the caulk yet), but it looked a lot better. We’ll only be living here until the end of May so it didn’t make sense to splurge on new walls that would have cost $200. If we owned the house, I would have done it in a second, but I made this work.
If your wall isn’t one of the colors of the stripes you want, begin with painting your wall.
step two-
decide where you want to start. I started in the corner and worked my way out. I did 12″ stripes. You can divide the wall into even parts, but I choose 12″ stripes since I had two different sized walls. With a pencil, I made a small mark on the wall where 12″ was. I then used the laser level to show me the line. I put tape where the line is.
Tip- a laser level makes it much faster to put tape up. I’ve used this tool on every big home improvement project I’ve done (recently tiling my bathroom and putting up wallpaper). It was worth the money!

step three-
mark with an x where you won’t be painting (these will be the white stripes). It’s important to know where you will be painting so that you can put the tape on the outside of those lines. My first stripe above was white and then the next one was grey. You can see that the grey looks bigger, but that’s because the tape is on the outside of the line.
step 4-
Continue with taping all of your walls. My 11′ and 9′ walls took up almost a full roll of tape.
step five-
Use your base color of paint and paint along the tape edge. My base color is white, so I used the white paint and painted it along the tape edge where the grey paint will go. This makes it so that if paint bleeds, it’ll be the white and not the grey. THIS IS THE KEY to perfect stripes! Sorry to yell, but this one “extra step” is worth every second!
Tip- seal your tape with your base coat of paint

step six-
Next, I used a paint brush to paint just the bottom of the wall. I didn’t want the paint roller to hit the ground and make a mess (even though we will be tiling). You can do this for the ceiling too, if needed.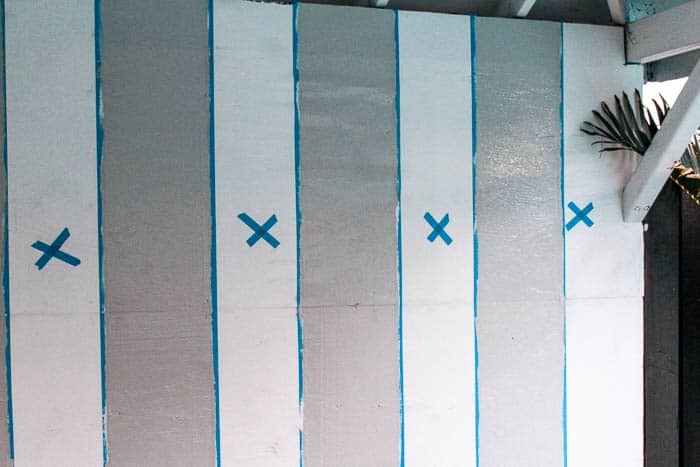
step seven-
Use a roller to paint your stripes. This part was so fun! Finally, I was getting a glimpse of how it’d turn out! I ended up doing two coats- mostly because the walls aren’t even and I wanted to make sure I got in every crook and cranny.
step eight-
Pull off that tape! Don’t wait for the paint to dry- it can mess up the lines. They came out SOOOOOO good!!! There were some small bleeds, but they were 95% perfect. And honestly, most of the bleeds were from where the walls have divots.
Tip- pull off tape when it is wet. Pull tape towards the wet paint so if you get any splatters, it lands on the stripe you just painted.
step nine-
For the last step, I used my white paint and painted over the caulk and any paint bleeds. This step made all of the difference in finishing off the project.

step ten-
Step back and enjoy! It felt pretty good to get to this point! The walls look SO much better! You can still see the imperfections, but I think that the stripes lead your eye up and take away from the gaps. Here’s the before again for reference:
after
I hauled my outdoor bench to the back and a plant for a quick picture! This little set-up made me pretty excited to get the patio all furnished! Next week we’ll be installing the tile, then we’ll add in furniture and it’ll be done in time for the One Room Challenge reveal!

I wanted to put all of my tips for painting stripes in one place. Feel free to pin for later:
If striped walls are on your to do list- let me be the first person to say that you can do it! Yes, there are some parts where you have to be a perfectionist. But for $30 of paint, it sure gives you a lot of bang for your buck! Plus stripes are so classic! And if you get tired of them, you can just paint over them. Best of luck!

This post contains some affiliate links for your convenience. Click here to read my full disclosure policy.


Love the stripes—and that pillow! Can’t wait for the reveal!
Thanks Michele! I’m excited too- I just got a console table for the back wall and I think it’ll be super cute!
This turned out wonderfully. I love the stripes. What a wonderful project.
Love the stripes. It looks so cute and tropical.
I love how stripes look. I’ve painted them twice in my current home. My biggest challenge was our textured walls. So if you look super close, you will see the unevenness, LOL! Visiting from Creative Circle.
Looks wonderful! Love me some stripes! Happily pinned!