 About 4 years ago, I wanted a Christmas village, but I was on a tight budget. With a little craftiness, I figured out a way to make a village with not a lot of money! Well, I’ve loved pulling it out every year. I thought I’d add one more house and update the tutorial and include a video too!
dining room decor

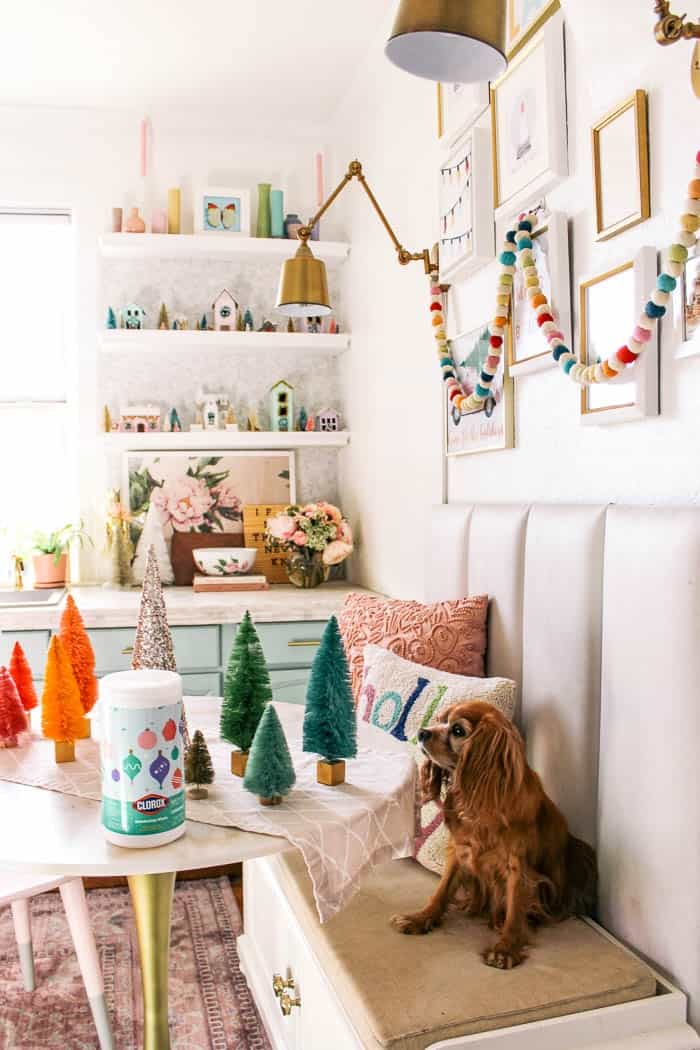
This year, I thought the holiday village would be cute on my kitchen shelves! So I pulled all the dishes off and made this little area. My son loves to climb on the counter top and play with the little scene. He’s old enough that I’m not worried about falling, but maybe next year I’ll put it in an easy to play with area!
 snowman art / merry and bright art / tree snow globe art/ rainbow tree art / fa la la, home for the holidays, and light art are free downloads from this post
For the wall behind my dining table, I did a gallery wall with a bunch of holiday prints. I’ve collected them over time and when I realized I had enough to make a collection, I was super excited!
 I added some garland I had on hand for around the kitchen window. I love how festive it feels! It’s hung with Command hooks.
The Christmas village is displayed with some mini bottle brush trees and mini deer from the dollhouse section at the craft store. I like to keep it simple with houses, trees, and a few deer.
Another addition to the kitchen this year are these mini Lennox village spice houses. I just got these and I am obsessed! There’s 24 to collect and I want them ALL- lol! You can find them on Etsy or eBay. I’ll like to some below.

how to make a DIY Christmas Village Houses
The cheapest way to make a Christmas village house is with chipboard or paper Mache houses. You can also paint Dollar store houses too! On the shelves in my dining room, I mostly used chipboard houses
Let’s start with the video tutorial so you get an overview on what I did. Then, I’ll dive in with more details below:
If the video doesn’t work here, you can watch it on YouTube here. P.s. I’m trying to build that page up, so if you’d subscribe, I’d really appreciate that!SUPPLIES

- paper Mache house
- craft paint- I ended up just using a light pink and gold for this house
- fake snow
- mini accessories– little wreaths, bottle brush trees, trim, decorative snowflakes, mini pom poms. I’ve found Michaels the best place to shop for these.
step 1

Start by painting the houses. I like pastel colors so that’s what I stuck with. Note, I tried out a fuchsia roof and ended up hating it and repainting it light pink, lol. The light pink took 3 coats of paint to achieve full coverage. 
This is the roof before I made it light pink. While the top coat of paint is wet, sprinkle on the fake snow so it sticks to the roof.
step 2

Next, construct the windows out of parchment paper. Hot glue them in where the window openings are.
Create the door from a cereal box. I just cut out a rectangle, painted it, and then glued it on.
step 3

And now, it’s time for the finishing touches! Hot glue on the wreath, festive trim, and trees up front. These details really make it come to life!
after

Here it is all finished up! It was a super simple craft. The great thing about it is that it’s really easy and fun to include a kid in the decorating fun! 
I ended up putting this little house on the shelf in my bathroom. That space barely had any holiday spirit, so I thought it’d be a fun touch!
tips to avoid a plumbing disaster this holiday season
Did you know that during the holiday rush- November through December, is when your plumbing system faces the toughest challenges? I thought I’d leave some tips for avoiding plumbing issues this year as you’re hosting guests.
toilets

Make sure to stock the bathroom with extra toilet paper, clean towels, soap, shampoo and conditioner for guests. Use candles or potpourri to limit unwanted smells
Be careful with what you flush down the toilet- wet wipes, cotton swabs, and floss can all back the toilet up.
tips for unclogging a toilet

If the toilet is clogged, don’t keep flushing as the toilet might overflow. Instead, find a plunge and get a good connection with the plunger and the toilet. Plunge with as much force as you can to push the blockage through.
Be quick and repetitive with the plunging motion and watch fo water movement which means the blockage is being pushed through. If you can’t repair a clogged toilet on you own, contact a plumber for assistance.
Drains

Make sure to use a sink strainer to effectively trap food and debris for the sink.
Also, keep fats, oils and grease from drains. Instead, let them cool off and put them into a grease holder.
tips to unclog a drain

To unclog the dream, make a mixture of 1/3 cups baking soda and 1/3 cups vinegar. When they combine, they fizz. Pour it immediately down the dream and the fizzing action will help it break down the gunk hair and time. Let it dit for at least an hour- overnight if you have time. Then, flush it with hot water.
The combination of baking soda and vinegar helps also keep the garbage disposal clean. If the disposal is smelly, add 10 drops of tea tree and lemon essential oils.
about Mr. Rooter
Mr. Rooter, a Neighborly company, is a full-service plumbing and drain cleaning franchise with nearly 250 franchises worldwide. Established in 1970, Mr. Rooter franchisees provide services to both residential and commercial customers.
Acquired by Neighborly in 1990, Mr. Rooter is part of Neighborly, a community of home experts, leveraging nearly 3,7pp professional home service experts worldwide. For more informations about Mr. Rooter, visit www.mrrooter.com.
Neighborly is a community of home experts worldwide. They provide consumer assistance with nearly all aspects of their home care needs.
 Thank you Mr. Rooter for sponsoring this post! This post contains some affiliate links for your convenience. Click here to read my full disclosure policy.
If you love it, pin it!