Confession- I have a linen closet that is such a mess, it’s embarrassing! The problem is that it is a VERY deep and narrow closet so things just get dumped in there and I haven’t known how to solve the problem. But, when I did the Craft Closet organization post, I was totally inspired! I figured I could start with the door and work my way back. I started getting inspiration and figured I would pass some of the things I learned on So let’s start with the before:
Scary! So let’s talk about the problems:
- I need to throw things away. I have 50 million bags in there and we just don’t need them
- There are bags hanging on each side of the closet so it’s hard to get to the back. I need to clear out one side so I have space to get to the back
- There aren’t enough shelves in the back so things are stacked and it’s hard to maintain order. I need to have more shelves cut
- The shelves fall off their brackets easily- the track may be installed incorrectly- I need to do some investigating.
- I need a better linen storage solution. They are packed right now tightly in a large plastic bin. So if I need one thing, I have to pull everything out to find it and then it stinks badly and I have to wash it before I can use it
- There are two kitchen stools in there that don’t fit in my kitchen that I need to store elsewhere
Here are some solutions that dear old Pinterest have helped me find:
Note- affiliate links are used in this post. These are only to items I purchased for this post or have purchased in the past and love. Thanks for your support!

Source. I need to utilize the back of the door for storage. This will also be awesome because then I don’t have to get to the back of the closet for everyday necessities. I have a theory with organizing that if you create a solution that you can maintain and be lazy, it will be successful.
 For that, I have purchased this from Amazon for $25. How great is that price?! Organizing systems are usually so expensive, so I think this is a steal 🙂
 Source. I need to utilize the depth of the closet for storage. My closet is narrow and deep so I can’t do much with this space (besides narrow racks) and still have access the back of the closet.

 For that, I purchased this cabinet rack for $4.50 and this wrap rack for $4.50. Again, you’ve got to love affordable solutions!
 Source. I need to put my linens in a breathable container. I LOVE using these Ikea Algot wire baskets because they are SO affordable- $3.75 per basket for the shallow version or $6 each for the deep ones. You just can’t beat that! I also love how this blogger labeled the baskets- durable and pretty (those are outlet covers)!
 Source. I might put the wire baskets just on shelves or I may use the algot system from Ikea. She spray painted her’s gold and it turned out so beautiful! Plus, how genius is that under stair storage?!
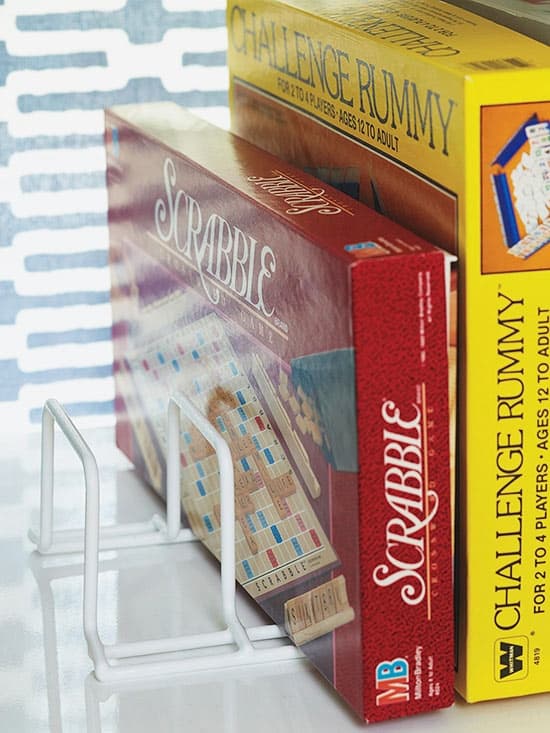
Source. I did a lot of searching to figure out the best way to organize games. Some people buy plastic containers so all of their games are uniform- I think that’s nice, but too much work for how little we play our games. I LOVE the above image mostly because their store their games vertically. So you can take one out and not have to stack and unstack to get to the one you like. They used a pot holder. I found a similar one on Amazon, but the problem is that the spacing on these is usually 2″ and most games are around 3″.
 I am really considering buying these solid shelf dividers for between games because you can place them wherever you want on the shelf, but they are kind of expensive ($15.85 for a set of two).
Before you begin organizing, I’d suggest going to the store and buying a few of these bins. At $1 each I use them all over my house and always wish I had one or two extras on hand. I have a few bins that I am going to downsize, so these will be perfect. They are my favorite cheap organizational tool! You can get them from the dollar store or Home Depot or Amazon for $1-$4 each. I then use labels from Michael’s (from the Martha Stewart line) and a sharpie to note what is inside. I love that no assembly is required (as opposed to Ikea boxes). They are see through so you get a visual of what is inside and can easily see if they are too full. When someone has a cold, I pull out the “First Aid- Cold” bin and we now have cough drops, Vicks Vapor rub, Nyquil- everything you need if you are sick.

Now that I was sufficiently inspire, I pulled everything out of the closet.
Scary!!! I then moved everything into piles and did the following:
The Organizing Procedure
-
- I picked up each item and if I loved it or it “sparked joy” I kept it (this is a method from the book “The Life-Changing Magic of Tidying Up” this is a must read book if you have any issues with organizing aka, everyone)
- If I didn’t love it, I threw it away or donated it. Even if it was hard and I thought I might use it one day.
- Think about how you use items. We had 5 top sheets and one fitted sheets. Who needs that many extra top sheets?! So 4 were donated.
- Get rid of faulty items. I had a ton of blankets. I haven’t used them all winter mostly because the material attracts dog hair like crazy. So I got rid of those and kept the ones I love and use.
- As I whittled down the items, I put away the items I love and are useful.
- I made a pile of items that I didn’t have places or bins for and made a note of what I needed to purchase
- I went out and purchased organization supplies for those items

I also feel very adult-like because I finally learned how to fold a fitted sheet! I watched a few YouTube videos and got very frustrated (haha- laughing at myself, but my goodness, folding a fitted sheet is HARD). Anyway, this is the one that finally explained it so I could do it. My sheets look so pretty now :)- yes I am very proud on myself.
I put everything back and here is how it looked. First, the before:


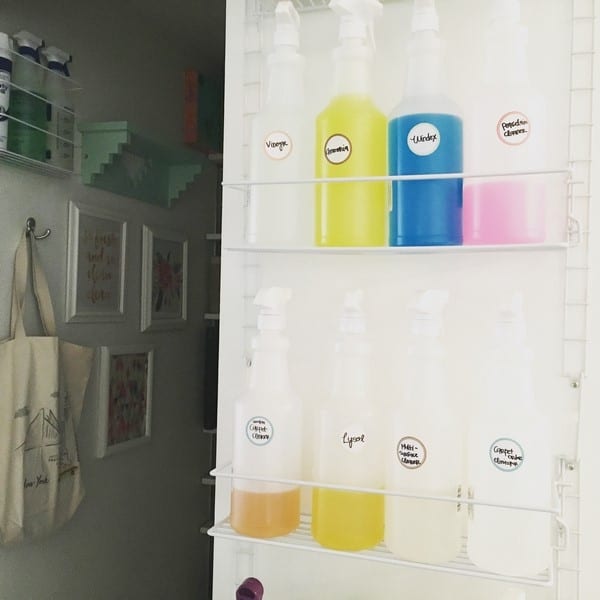
The biggest game changer is the cleaning supplies on the back of the door. I love that I can quickly grab what I need and no longer have to climb to the back of the closet!
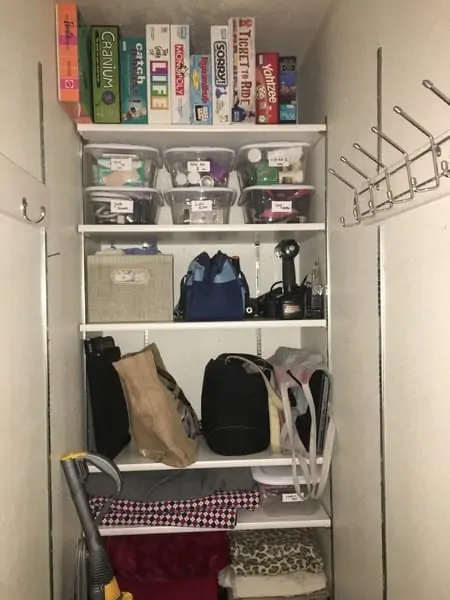
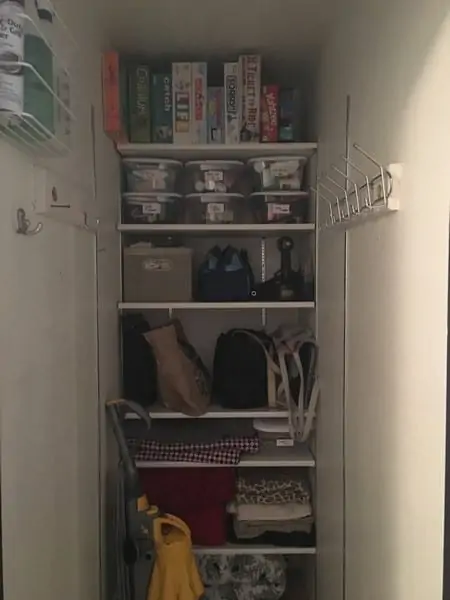
I had more shelves cut at Lowes. It is SO nice to have the extra space to have a spot for everything. My husband was kind enough to make space in the garage for the stools so there is way more room now! We actually ended up having two empty shelves.
We moved our drills and basic home tools to these shelves so we don’t have to run downstairs to the garage now! The other extra shelf holds off of my work bags (laptop, pump bag, bag for my lunch box, binders, and water- yes, I am a bag lady at work!)
 For the games, I stacked them vertically and then decided I don’t need dividers. They are SO much more accessible just stacking them differently! And prettier 🙂
 I got rid of a bunch of bags and hung everything else on the one side of the closet. Now there is a huge walking path where you couldn’t open the door with something falling out before! I decided that I didn’t need the baskets for the linens. They would be nice, but I worry I would actually be able to hold less and I was over spending money on this project. Maybe in the future I will add them and the adorable labels I posted about above.
Budget-
Extra shelves and pins for the shelves- $40
Matching bins (I bought 10)- $10
Back of door storage- $28
Amazon storage bin (I only ended up using one) $4.50
Total- $82.50
I know the pictures aren’t 100% Pinterest worthy, but the closet is SO functional! The thing about a closet clean-up is that it is so satisfying! Sure it’s a pain and takes a few hours out of your life, but figuring out a solution to a closet that has been a mess for the last 6 years of my life made me so happy! I love putting my stuff away because there is a clear spot for everything and it works for how we live. If you have a spot (maybe a drawer or a closet) that is cluttered and a mess I just wanted to encourage you that you can do it! You can conquer it and make your life better! Order in your home makes your whole family happier! It was really fun to work on this project with my husband. He actually organized all of the cleaning supplies and put in a secret shelf above the door frame on the inside.
Update- I loved the functionality of the closet, but it wasn’t pretty enough. I’ll be honest, I was underwhelmed. It just looked ugly in pictures. I loved the functionality and it was world’s better than before I organized it, but it just wasn’t pretty. I was so disappointed! I loved it in real life, but I was embarrassed of the mediocre pictures. I looked at pictures of other organized, gorgeous closets on Pinterest and started to see themes of how they got there. Here is my how to on making your closet Pinterest pretty.
So here is where we stopped off- good not great:
note: affiliate links are used in this post
After a ton of research, here is how to have a Pinterest pretty closet:
- It’s all about making the eye happy. The eye likes repetition and uniformity- so use the same containers over and over again (bins, bottles, baskets)
- Labels aren’t just about telling you what’s inside a container- it’s where you can be artistic and express yourself. A pretty label with a uniform container? A match in Pinterest heaven 🙂
- Pay attention to the details! Every item needs to be folded perfectly, extra clutter needs to be gone. It needs to look perfect (which is hard and takes time)
- Tell a color story- a strong 2-3 colors make the eye happy and tie everything together.
Update: I did a whole post with examples on ridiculously pretty linen and cleaning closets here!
Here is what I did:

 I put all of my cleaning supplies in uniform bottles. I bought the bottles at the Dollar store. I tried out a few (shown in the first picture). I liked them, so I went back to buy more. They were out of the green bottles and had white bottles (even better), so I went with those. P.s. I used old Martha Stewart labels from Michaels I had on hand (these are similar). I just found out they are discontinuing all Martha Stewart labels at Michael’s- I am so sad! I have some I swear by, so I stocked up on them because I use them everywhere in my house.
I used colorful mason jars from Michael’s for the small items like sponges, steel wool, magic erasers, and gloves. Have you ever seen sponges look so pretty?! 😉


 I added in Art and a Shelf for personality. In my last linen closet post, I wrote about how I was sick of spending money on this project. So I decided to add in some personality on a budget. The best way to do that? The thrift store! I got a shelf and 3 frames for $4- you can’t beat that! I gave everything a quick sanding and a few coats of paint. I liked the idea of a shelf for the closet so I can stash items on it (things like presents I have bought in advance) without junking up the floor. I feel like I totally lucked out finding this southwestern feeling shelf! I painted it a discontinued Martha Stewart color from the Home Depot- sea glass. They have the color in their computer and can mix it with Glidden paint (p.s. I HATE that Martha Stewart starts awesome collections and then discontinues them within a few years- ugh) Here are the art sources (all from Etsy):
- Geometric Abstract Triangles
- Rustic Flowers
- So Fresh and So Clean Clean– perfect for a cleaning closet!

 I took off the extra hardware and filled in holes. Like I mentioned above, good design is all in the details. There was extra tract for the shelving drilled on both sides of the closet, so I pulled that off and filled in the rest of the holes in that closet. The person who installed the tracts for the shelves drilled a million holes looking for the stud and I was the lucky person who got to patch, sand, and paint it out. At least we know the shelves are sturdy?!


 I used baskets from Ikea for the blankets. I love these Ikea baskets (from the Algot collection) because they are cheap ($3.75 for the small and $6 for the large) and they let your linens breath. Now I just pull the baskets out like a drawer and I can quickly find the linens that I need. I used blank outlet covers ($0.59 each) with a label on top and ribbon to secure to label the bins. This probably wasn’t necessary, but it’s pretty and good to know at a glance what is where.
 I really paid attention to the details. I painted the bottom shelf of the closet white (it was brown before) so that it was uniform. I also added a paper towel holder ($1 from the Dollar Store). I needed the shelf space (the spray bottles from the Dollar Store are larger than store spray bottles) and I love that it is a one hand, quick way to grab a paper towel.
One last look at the before photos:
Scary! Before I touched it- you couldn’t even walk in there!

Here she is all organize and functional, but not fun to look at
And now for some after pictures, now that it’s Pinterest Pretty:


Awww, so much better! I now declare this closet finished!

You are so spot on with this post. So pretty and Pinterest-y! I think I hear Ikea and Goodwill calling my name 😉