For the past 5-6 months I’ve been slowly redoing my kitchen. I’m just now to the point where I’m happy with the whole room! This space has come soooo far, I thought I’d share the before and afters along with a price break down for the whole project!
before and after

I have listings photos of the house from almost exactly 6 months ago with an image from how it looks today. Honestly, the kitchen is so much brighter and happier!


projects and costs
I thought I’d run through each project I did with the cost and then I’ll add it all up at the bottom. Note, for the costs, I’m adding up everything you’d need for each project. A lot of the supplies can be bought once and then used multiple times (especially the painting stuff).
Another note, my kitchen is pretty big so in some places I needed to buy more supplies than someone with a smaller kitchen would. Essentially, my prices might be on a bit of the high side, but I’d rather you be happily surprised when the price is less if you do any of these projects.
fridge- $46
First off, I painted the fridge pink with gold handles. It is a terrible old fridge (the light doesn’t work and the shelves in the door are broken) BUT paint fixed the white exterior and for $46 it gave me a TON of bang for the buck!
painted cabinets- $148
Next, I painted the cabinets with chalk paint– the lowers went a mint blue color and the uppers are now white. I worked on this project on and off for 5 months and finally just finished! I think it could all be done in a few weeks if I wasn’t trying to redo my whole home at once 😉 . Hands down, this was the biggest change to the room!
peel and stick backsplash- $308
I wasn’t a huge fan of the tiled backsplash, so I covered it up with a peel and stick backsplash. I got 14 packs of the hexagon tiles for my kitchen and used every single pack! This made such a HUGE difference in modernizing the space and they have held up great.
To me, the fact that I didn’t need to to tear out the old backsplash tile, repair the drywall, buy new tile, and install tile saved me SO much time! And mess. So while this was a bit of a bigger ticket item, I am THRILLED that I went for it!
Side note, some small projects still need to be done- like put the crown molding back up on the right side of the chimney bump out.
painted counter tops- $89
To get update the counter tops, I decided to paint them with chalk paint to look like marble. They still have the tile grout lines, but are much improved! Another option if you’re looking to update old countertops is to cover them with concrete (I have a full tutorial where I tried it in my butler’s pantry).
wall paint- $68
The walls were a terrible green color with brown trim and bead board. To combat that, I simply painted everything white (I use eggshell everywhere and the color Ultra Pure White).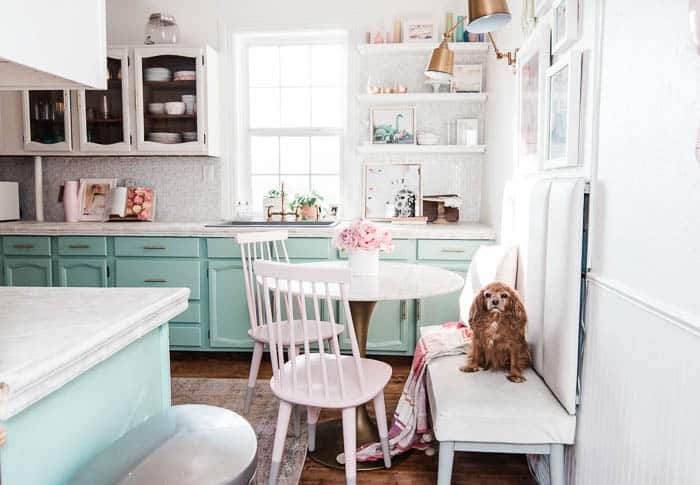

open shelving- $45
Next to the window was a big upper cabinet that we never used (this kitchen has WAY more cabinet space than we need). So we pulled down the cabinet and replace it with open shelving. This lets more light into the space and is a really fun place for me to decorate.
sconces- $99
Behind the banquette, I added sconces to the wall. This side of the room gets really dark and we turn these on daily. Plus they’re cute 😉
Another project I need to get to- painting the bottom of the cabinets. Sometimes with projects, I do the first step and see how much I need to do the next part. These brown bottoms are bugging me so they’re officially on the to do list.
table- $500
The pink chairs we already had from our last home (they are $130 for two chairs). The new addition is the brass and marble dining table. It is the perfect size for tight spaces- 35″ wide! That was a bit of a splurge at $500. But its the exact look and size I needed.
banquette seating- $290
The kitchen is tight on space so I decided that having a bench would be the best way to capitalize on that! I used a $70 bench (that I ended up painting and recovering with pleather for $20). The banquette seating is made from Vant panels (I got the twin size in Vintage Leather White Dove). These were $199 and come with a system for attaching them to the wall. This could be an easy DIY project too- I think you could get a similar look for around $50!
sink and faucet- $609
Another big splurge I made on this room was redoing the sink and faucet. In the next 2 years, I’m hoping to save up enough money to do a bigger renovation in here (think changing the layout, tearing down the room between the living room- a HUGE redo). When I do that, I’m planning on using this same sink and faucet. So I look at it like an investment.
hardware- brass pulls- $154
The brass hardware that I used in my kitchen also really helped update everything! I love the modern look with the traditional cabinets. Each pull is $6 which is a really good price!
ceiling fan- $277
One of the things people ask me about in my house is ALWAYS the ceiling fans. They are all made by Kichler (I have a bunch throughout my house) and are the prettiest fans I’ve ever seen! I switched out the brown blades for white ones.
tile behind the stove- $149
Behind the stove, I thought it’d be fun to add in a star tile. I looooove the look! And it was pretty affordable to do too. Side note, peel and stick tile isn’t meant behind a stove because of the risk of flammability. That’s another reason why I switched things up here.
Art and Accessories- $180
Lastly, I’ve added some art and accessories in here. I already had most of the accessories in here, but some of the art is new. The rug is from my condo and was in my dining room- it is a 5’x8′ and is on sale right now for $169. It holds dirt so well and the colors are perfect for my color scheme!
Total- $2,962
In the past 6 months, I’ve spent almost exactly $3,000 on my kitchen. And now I have a space that I LOVE! A room that speaks to me and reflects my personal style. I count that as a win. As always. everything added up quicker then I thought it would.
When I did a full gut kitchen renovation in my last kitchen (which was tiny), it cost around $9,000. My kitchen isn’t exactly how I want it and one day I’ll rip everything out and do a full redo. But for now, its good! It feel so much happier and so, for me, the $3000 was 100% worth it!
Did you miss any of the kitchen renovation posts? If so, catch up here!
kitchen remodel on a budget- how I was able to do a bunch of DIY projects to completely redo my rustic space. From the countertops ot the cabinets to the backsplash I did a big renovation and share all of the before & after photos. Ideas on how you can also redo your old kitchen and save money doing it. Click through to see the pink fridge, white upper cabinets, and mint lower cabinets Tutorial for install peel and stick backsplash tile. Plus a round up of the best ones.Kitchen on a Budget
DIY Peel and Stick Backsplash Tile
 This post contains some affiliate links for your convenience. Click here to read my full disclosure policy.


Love it? Pin it!
