 It’s super sunny and warm where I live right now. And all the sunlight is making my indoor plants so happy! I love having plants around the house because they bring color and life to any room. I’d definitely say they’re one of my decor go-to’s!
The Cutest Shower Curtains

I love me a good shower curtain! Why? Because I’ve found that they can really make the difference in your bathroom. They can add color and character, or softness and texture. Also, they can be super versatile. Meaning, you can use them for tons of different functions besides just for your shower!
DIY House Siding

The back of our house was a MESS. The whole house is covered in wood siding- except the laundry room and two bathrooms. Those both had vinyl siding and were mismatched from the rest of the exterior. With the laundry room renovation, that siding came down. We needed to fix it, so we decided to put up diy house siding to unify everything.
before

Here you can see the plywood on the laundry room. All of the stone is from a chimney that we removed. It wasn’t functioning and was causing a leak. The siding is over our two bathrooms. See what I mean by a mess?!

This has been a slog of a project! My husband and I didn’t enjoy it so we let it drag on. Well, finally, we finished phase one of this project so I thought I’d share our process.
diy house siding
Step 1- remove the siding that you no longer want.

Step 2- Cover the plywood on the house in Tyvek Home Wrap. We nailed ours on and used Tyvek tape on the seams. Flashing Tape was used around the windows to keep water out. Step 3- Next, we installed the trim boards. We ended up liking the following look- first we put the “baseboard” down, then installed the siding (so they are flush), and then installed the window trim on top of the siding.
We continued that step around to the laundry room too. Trim was installed on the corner to seal it.
Step 4- last, I caulked all the seams and screw holes. It took forever, but I was motivated by the fact that I could get paint soon- after weeks of it being under construction!
after
Here is the back of the house now, it is looking much better! I used this exterior paint in the color- Ultra Pure White. I love, love the white! Though this does mean that the rest of the house will need to be painted one day in the same white. You can still see where we need to patch the house from the chimney, but little by little we’ll get there!

Part of what motivated me to finish this project is I am SO excited to put a swing here! Our backyard isn’t very private, but in the alcove, is a rare space that is shady by 3pm. It’ll be perfect for an outdoor swing!
Figuring out a “fun” aspect of a project can be majorly motivating! Having a vision for how you’ll enjoy the space can make it so you can push through the hard parts.
I was just reading a book today (“Girl, Stop Apologizing” by Rachel Hollis) and loved this quote- “If I want to achieve any new thing in my life, the question is never, Can I do it? The question is always, What am I willing to give up in order to get it?” I LOVE that! I got plenty of relaxing in yesterday, but I also spent a bit chunk of my day painting. Because this is something I wanted.

I set up my outdoor table and umbrella in front of the newly finished siding. It looks so cute! We actually still need to excavate and lay down more pea gravel, but I just wanted to see this spot looking pretty. It felt good after all the hard work.
swing plans
The next step is to build a frame for a swing. We have the cutest swing sitting in our basement, just waiting for us to get to it. And now we’re almost there! My husband will build the frame and I’ll paint it white and we’ll hang it shortly.
Here’s the plans- I pulled this together to show my husband what I want so I thought I’d put it on here too so you can kind of follow my train of thought.

On the top right is the plan for the frame- nice and simple. On the top left is how I want to embellish the frame. I’m thinking lattice on the sides and top so I can eventually grow wisteria on it!!! I’ll add corbels that match our front porch to decorate the corners. And decorative trim for the front to add a little Victorian character.
The swing is no longer available, but is actually white (I could only find a picture of the black version). That’ll have a bench cushion and a few pillows for comfort and decoration.
So that’s where we are and where we are going! What do you think?! Excited about the swing too?
 This post contains some affiliate links for your convenience. Click here to read my full disclosure policy. Thank you for reading this post on diy house siding.
If you love it, pin it!
Budget Bathroom Update
Thank you to Better Homes & Gardens at Walmart for sponsoring this post! Click here to read my full disclosure policy.

Just over a week ago, I started work on this bathroom. We have two restrooms in our house and this one is my husbands. It hadn’t been updated at all and the dark paneling and tile felt so opposing! I figured- wouldn’t a budget update be fun?! One day we’ll completely renovate this space, but for not it’s feeling SO much more a part of our house. [Read more…]
Pastel Pink Oven Makeover
 Last week I wrapped my oven with hot pink vinyl and I hated it! Well, I just hated the color, so I ordered some vinyl in another color and started over. The best thing about failing on a project is that I got to test how well the vinyl came off! [Read more…]
Pink Patio Furniture Roundup
Pink Patio Furniture Roundup

Summer is finally here! That means spending lots of time outside enjoying the sun and the nice weather. Who else has been BBQing nonstop like us? [Read more…]
DIY Rainbow Stripes on Furniture
 I found a $6 little cabinet at the thrift store and scooped it right up! I’ve been looking for a small piece for under my mirror and thought this would be fun. Lately, I’ve been experimenting with different painting methods and knew this would give me the opportunity to test some new things out!
Stripes, painted molds, and decorated drawers- this’ll be fun!
Formula for a Budget Bathroom Makeover
 Let’s talk about why I’m doing a budget bathroom makeover. This is a bridge project- it’ll be good enough until I can invest in a full renovation with new tile, drywall, and adding heat in here (it is freezing in the winter). Until then, I have a $500 budget to transform this room.
 [Read more…]
She Shed Potting Bench- Crackle Finish
 Over the past few months, I’ve been redoing my She Shed. One thing on my wish list was a potting bench- I wanted something with storage (for the ugly gardening supplies) and also a spot where I could pull up a stool and work. Well, my husband made my dreams come true by building one for me!
It’s made out of 2×4’s and the shelves and top are left over hardwood floors from our bedroom. I LOVE it! It was custom made to fit perfectly in here. It honestly feels so sweet to have a hand made piece from my hubby. He started building me things when we were in college and I love that he is still going strong. I feel pretty lucky that I married such a handy guy.
ANYWAY, I’m the painter in the family so it was up to me to finish it off! I decided that I wanted to try for a crackle finish. Want to hear how I did it?
how to paint a crackle finish
Let’s start with the video tutorial so you get an overview on what I did. Then, I’ll dive in with more details below:
If the video doesn’t work here, you can watch it on YouTube here. P.s. I’m trying to build that page up, so if you’d subscribe, I’d really appreciate that!SUPPLIES
- crackle finish
- lemonade chalk paint
- tea rose chalk paint
- fluff chalk paint
- satin clear top coat
- paint brush

step 1
Start by painting on your first coat. I wanted a beige/orange color so I mixed a custom color with Lemonade and Tea Rose chalk paint.
With crackle paint, the first color you paint on is the color that will show through the cracks. I painted a light coat of paint, making sure to spritz my brush with water to help the paint glide across the wood.
step 2
Next, after the first coat of paint is dry, it’s time to paint on the crackle finish. This is really thick, but don’t thin it out. The thicker the coat of crackle, the bigger the cracks will be.
Note- since you’re painting on a thick finish, it can tend to drip. Make sure after it’s dried 15-20 minutes to clean up any drips that might have formed before they’re permanent. Second note- I went through crackle finish quickly since it’s applied so thickly. I used a whole 8 oz. container for this project.
step 3

And now, paint on the top coat of paint. This will be what’ll primarily show. Apply the paint thinly. As the paint dries, the crackle appears.
If you accidentally go over an area twice with the top paint, that’s ok! The crackle will still show through (though maybe a little lighter). So if your crackles are too bold, give it another coat of the paint.
If you missed a section with the crackle paint, you’ll have to go back to the first step and start over again. Don’t miss the crackle finish 🙂
Finish by sealing the piece after the paint is dry (usually 24 hours). I suggest a clear top coat to protect everything.
after
Ta da! Here is the potting bench in place! The crackle is subtle in pictures, but in person it has a really sweet shabby chic/vintage vibe that I love!
We specifically built a narrow piece to fit in this tiny room. The shelves perfectly fit the galvanized bins that act as drawers. One bin is full of potting soil, one has empty pots, and the last one has gloves and other gardening supplies.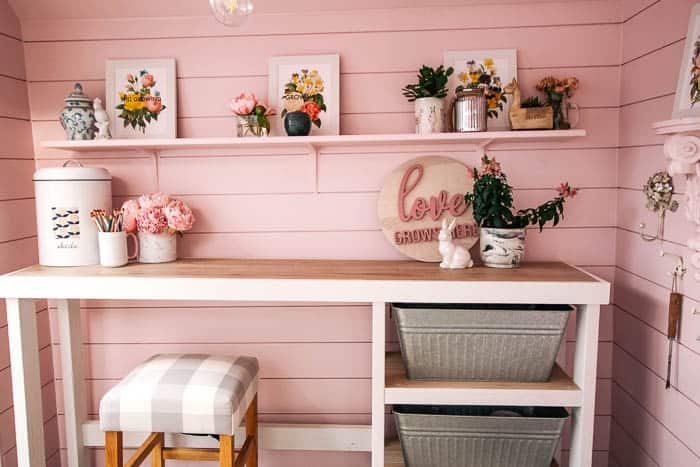
I now have a nice place to work! I’ll be using this as a potting shed, but like that I now have a nice “desk” area too. I am thinking about maybe skirting the shelf area to soften this area a bit- what do you think?
counter stool
Did you notice the cute counter stool I have at the bench? It’s from Home Pop Furniture and is SO cute! I am obsessed with the grey buffalo check finish! And the warm brown finish on the legs is perfect in here. 
The beauty of this piece is that it is comfy in addition to being cute. If you need some good counter stools in your life, they are nice and affordable too! Here’s the link for it (plus it’s on sale right now!).

I’d love to hear your thoughts on the latest addition to the she shed! And what are your thoughts on skirting the potting bench shelves- yay or nay? Let me know in the comments!
 This post contains some affiliate links for your convenience. Click here to read my full disclosure policy.
If you love it, pin it!
Budget Bathroom Makeover Plan
 The other night on Instagram I was talking about how my projects ebb and flow. I’ve noticed a cycle of plan, create, and rest. Ever since the completion of the laundry room, I’ve been resting and planning. It’s a crucial part of the process, but it can sometimes frustrate me when it takes time to get on to the next project.
But I feel the winds are changing! Which means that things are about to get exciting!
So what’s my next project? To be honest, I’m in the middle of a few! Right now we’re redoing the exterior siding. Also, we’re building a potting bench for the She Shed and that should be done soon too. But I want to tell you about another fun project- [Read more…]
- « Previous Page
- 1
- …
- 55
- 56
- 57
- 58
- 59
- …
- 103
- Next Page »
