Hello! My living room is continuing to shape up- this week I choose from my favorite 7 pink chairs and narrowed it down to one. Want to see what I choose?! Drum roll please… [Read more…]
Ikea AVDALA Bookcase hack
 When Don was a year old, I added an Ikea AVDALA bookcase to his nursery to help conquer toy clutter (can you just die over how little he was?! Just me? Ok 😉 ). Since then, I’ve wanted to customize the bookcase to look like a little house and make it special. Here is the inspiration:
the inspiration

Living Room Refresh- Art, Chair, and Sofa
I have been working on my living room, giving it a nice little refresh! So far, I’ve shared with you the plan, updated the art over my bench, dreamed about pink chairs and shared the new TV. Well this week is exciting because you get to see what chair I choose plus some new art for the space!
chair

An exciting development is that I want to share is I choose a pink chair! I really wanted a petite chair so I am going with The Tyley from World Market (no longer available). It will visually lighten up the space and add that pop of pink that I love. Again, I’ll be sure to update the blog with pictures when it arrives! I think she is the perfect partner to the sofa.
art
I had an artist Claire Kendall contact me about using her art in my home. I clicked over and couldn’t believe how beautiful her art is! It’s a little quirky, a lot beautiful, and she uses pink and lots of flowers. AKA, its perfect for my house. Claire was nice enough to paint a piece that perfectly fit my house. I choose Cosmo Jenny (no longer available) after going between pieces (they are all so pretty!). It arrived and this is where I placed it: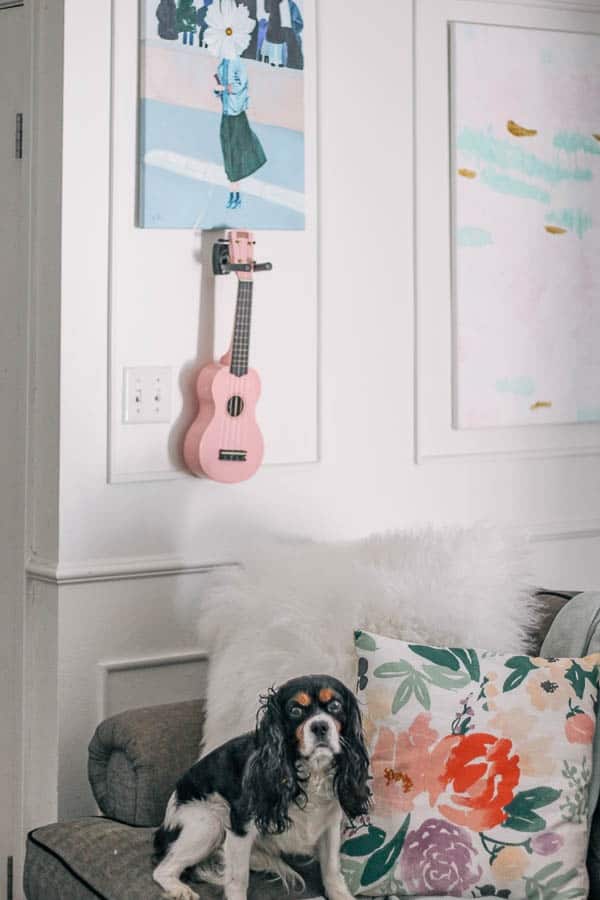
I’ll be honest, I wasn’t in love with how it looked here. It was competing with the art next to it and behind the sofa and I really wanted it to stand out. So I moved it to over my desk:
Isn’t that much better?! She is definitely the star of the show over here and the perfect inspiration for me as I work. [Read more…]
Tips on Organizing Kitchen Cabinets
Hi Friend! This is an exciting week- our new sofa is arriving! I’m hoping to have an update on that by Friday (fingers crossed!) I also have a pink chair on its way that is so cute, you’ll die! So the living room is coming together.
inside our cabinets
A few months ago I revealed our new kitchen. I still get tons of questions about it and by far, the request I get the most is to see the insides! For our remodel, we went for more drawers then doors since items tend to get lost in the back. We are thrilled with this decision! Here’s to the left of the stove:
This post is sponsored by Barilla. All opinions are my own. This post contains some affiliate links for your convenience. Click here to read my full disclosure policy.
Parade of Home Trends
Hi Friends and happy Friday! This has been a busy week! First of all, I was on TV sharing how to make my DIY mop wall hanging! If you’d like to see it, here’s the segment. I also did a photo shoot at my house- so happy dance because that means pretty pictures will be here soon! Here’s a sneak peek photo from the shoot.
A few weeks I attended Salt Lake’s Parade of Homes. If your city doesn’t do this, it’s an amazing interior design event. Basically, new builds can be in the parade and they are decorated. Its a great way to see the trends and what’s coming up in interior design. I thought I would show you my favorite trends that I spotted!
decorative molding
Living Room Refresh- How to Decorate around The TV

For years, I had a black box of a TV that was the biggest eye sore. I had to dig through images 2 years old because I never took photos of the ugly thing. Are you ready for it?! [Read more…]
My Summer Soiree- tips on throwing a Dinner Party
 For years I have dreamed of throwing a dinner party in a beautiful setting with delicious food. Knowing I was going to quit my job, I thought it’d be the perfect chance! I jokingly called it my retirement party (see my post about quitting my job here) and started planning. My concept was to make it as pretty as possible, invite my best friends, and have a good time. I thought I’d share what went right and what I would change.
 [Read more…]
Pink Chair Love
Hi Friends! Happy Tuesday! I have the color pink on my brain. It has slowly crept into my house and I love how soft it looks when done correctly. Pink/blush is definitely a trending color so I am trying to use it sparingly and in accents through my house. Last week I toured the Parade of Homes in Salt Lake and without fail, there was a pink adult space in each home. I loved it!
parade of homes

This room had blush accents in the bedding and accessories. It really popped against the white walls and it was stunning!

In this house, there was a pink bedroom and bathroom with the perfect pink walls. I loved the slipper chairs too!
As I’m planning my living room makeover, I can’t help but dream of having a pink chair in my living room. I think it’ll be the perfect fun pop of personality and color. I’ve been doing a ton of hunting for the perfect chair and wanted to share my favorites in case anyone else is also looking: [Read more…]
Living Room Refresh- Abstract Art
Last night I threw a summer soiree for my friends and guys, it was a blast. I am dying to see the pictures and share them with you! I went all out and had fresh florals, a cake, real place settings, catering- so check back next week for those pictures! Honestly, the best part was spending a summer night with my besties!
A few days ago I dreamed aloud and let you know what changes I am planning for in my living room. As a refresh, we are changing out the layout to accommodate a new tv, getting a new sofa and chair and art. Here’s the mood board of the grand plan:
Well, the new art arrived sooner than I thought it would so it went up! Right when you get to the top of my stairs, I have my favorite area for photos- I have a pink bench and DIY botanical art:
before
Living Room Refresh
Now that the dining room is all wrapped up (and we LOVE it! The reveal is here) it’s time for a new room to focus on. I have three choices- the bathroom, but I’m saving that for October for the next One Room Challenge. Or I have the laundry closet or the living room. We just got a new TV so we totally switched up the layout of the living room. So I guess that means it is next!
living room refresh

The new TV is the Frame from Samsung. This TV is amazing! It is super compact and you can hang it to look like art on your wall! It has a genius cord solution- pretty much it comes with a box for cords and then one cord goes down from the TV. To be so obsessed with a TV is not my style, but our old TV was 10 years old so it was huge and black and a total eyesore! [Read more…]
- « Previous Page
- 1
- …
- 85
- 86
- 87
- 88
- 89
- …
- 102
- Next Page »