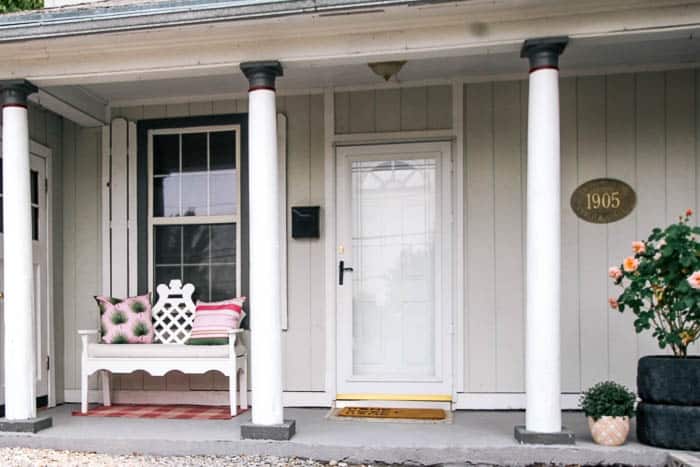
When we first moved into our house, this is what the porch looked like- fine, but nothing special. The doors were white vinyl with an arched window. And lots of dents and scratches. I dreamed about changing it, and finally that happened!
a home decor blog, making it pretty one space at a time
When we first moved into our house, this is what the porch looked like- fine, but nothing special. The doors were white vinyl with an arched window. And lots of dents and scratches. I dreamed about changing it, and finally that happened!

Hi friends! Its week two of the One Room Challenge! Last week I announced that I’ll be redoing my master bedroom. This week was all about the demo and planning for how the room will turn out. As a reminder, here’s how the room started out- [Read more…]
 I’ve been on the hunt for some special and affordable wallpaper for my office. When I saw the above image on Amazon for a $100 mural, I was stopped in my tracks. Don’t you love the vintage botanical look?! I ordered it right away, and spoiler alert, its a goooood wallpaper! [Read more…]
Hi friends! This morning I’m going to talk about a super popular project I shared over on my Instagram stories- how to have sconces without power or plugs.
Let’s back up, when I put up the sconces in my kitchen, I wasn’t sure what to do with the cords (they were such an eyesight!). I got a TON of recommendations to check out “The Magic Light Trick” from Nesting with Grace. [Read more…]


This is it! The first week of the One Room Challenge! If you’ve been following along here long, you know I LOVE the challenge of redoing a room over 6 weeks from start to finish. In the past, I’ve done some of my favorite spaces as part of the ORC- like my bathroom and kitchen. [Read more…]

A few weeks ago, I shared the plan for the bathroom. Well, I’ve been working on it hard! A bigger window was put in, wallpaper is up, the walls are painted and new trim has been installed. I even have a new toilet! But there was one area that I haven’t addressed- and that’s the floors. [Read more…]
My son has been begging to put up our Halloween decor. I have great memories of putting up holiday decorations with my mom and sisters- so this made me so happy! I’ve been wanting to paint my entertainment center, so I used the deadline of putting up fall pieces up to get myself started! Here’s the before:
I needed a dresser for Don’s room and have been searching local thrift store and antique shops for awhile. I couldn’t find what I wanted (or really much of anything) and I was getting a little frustrated! I needed a place for his little socks and pajamas, dang it! 😉 
Then I discovered the miracle that is the Ikea Rast dresser. Guys, its a $40 dresser that is as plain as possible which means that you can dress it up while still being budget friendly! We made a special visit to Ikea for it and I was excited to get to work.

supplies

Assemble the dresser. Next, paint the outside of it your color of choice. You’ll want to paint the edges of your dresser too. I skipped this and it will add a more finished look! You’ll want to do two coats of the chalk paint and then a coat of the clear coat.

For the second step, you’ll want to trace the front of your drawers on the back of your wallpaper. Trace the drawers three times. Make sure to start at the top left of the wallpaper and work your way down so that the pattern is continuous. Once the drawer fronts are traced, cut the wallpaper on the lines.

To activate the paste on the back of the wallpaper, use a paint roller soaked in water and roll it on the back of the wallpaper. Book your wallpaper (by sticking it onto itself as shown) and let it sit like that for 3-5 minutes. Once its sat, apply the wallpaper to the front of the dresser.

To add on legs (which is totally a personal choice- I wanted to dress up the dresser), start by painting the wood legs. Next, turn the dresser upside down. You’re going to add two pieces of wood to the bottom of the dresser with screws. Screw on steel plates- these will stabilize the legs.


Finally, just screw on the painted legs. Finish by flipping your dresser upside down and screwing on the drawer knobs.

And there it is!!! I am so, so happy with how this little dresser turned out! I think the pattern is so fun- its definitely a statement piece!

I accessorized the dresser with a vintage fan and chair I found at antique shops. The prints are from here on Etsy.

I really like that the dresser coordinates with the nightstand while standing on its own. Would you ever add wallpaper to a dresser? For getting a custom piece, this was a pretty easy project- definitely beginner DIYer level!
When I posted a photo of this dresser on Instagram, I had a lot of requests for my favorite boy wallpapers. It can be hard to find something cute for boys rooms! So here are my favorites-
1. gingham / 2. orange and navy ocean / 3. blue animals / 4. grey and mint cars / 5. mountains / 6. grey map / 7. constellations / 8. safari / 9. sharks
I think any of these wallpapers would be cute on a wall in a boy room. Plus, they’d also be perfect on this project too. I like that they’re whimsical and fun. And there are a few gender neutral options too!
![]()
Thank you to apartment therapy for featuring this dresser! You can see the post here.
 This post contains some affiliate links for your convenience. Click here to read my full disclosure policy.
Want to remember this? Pin this to your favorite Pinterest board!

As we moved into our house, the first big thing I selected was the overhead lights. I went with ceiling fans in most of my rooms (you can see more about that here). But it was fun to branch out on a few key spaces! Selecting lights can seem a little overwhelming, but they don’t have to be! I’ll give you my best tips for choosing lights you love that’ll work in your home. Because, let me tell you, good lighting makes all of the difference! [Read more…]
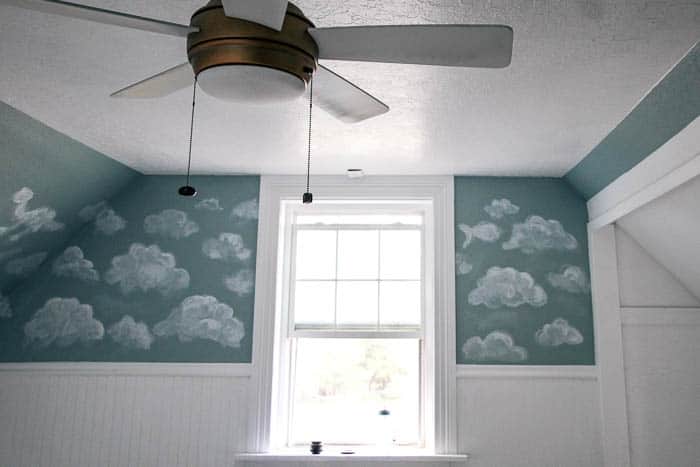 I’ve been doing A LOT of work on Don’s room! If you remember, the loose theme for his room is Toy Story (to look like Andy’s bedroom). I’m being inspired by that space and interpreting it for 2018. Which, for me, means clouds on the wall, but fluffier less precise clouds. [Read more…]
